Introduction
I am pleased to announce that Sagelight now has advanced noise reduction.
Sagelight’s Noise Reduction is capable of removing large amounts of noise while keeping details pure. Sagelight analyzes your image and determines where noise vs. details are located and intelligently removes the noise from your image. With the Edge & Details Controls, you can further (and easily) control how the details in your image are handled.
(note: this document differs from the beta release post in important areas)
Where to Find the Noise Reduction Release of Sagelight
Download it from http://www.sagelighteditor.com/Sagelight.exe
What you will need/requirements:
1. Windows XP, Vista, 7, 8, etc.
2. A trial copy of Sagelight Editor during the 30-day trial, or a purchased copy of Sagelight. Download the trial at http://www.sagelighteditor.com/downloadtrial.html
Real Noise Reduction
It turns out that noise reduction – real noise reduction, that is – is serious business, both for those who use it, but also for those who develop the algorithms behind it. When developing the Sagelight Noise Reduction algorithms, I ran across dozens of methods, and many more examples. One the most common issues I came across was that only the best examples were shown for any given type of noise reduction. Many noise reduction algorithms work on some images, but not on others and sometimes leave the image looking worse – anyone who has used some of these methods know that they often leave your image with a combination of smooth areas and hard noise left in the image, causing visible edges and ugly artifacts.
Sagelight’s Noise Reduction was developed with these issues in mind, and uses sophisticated algorithms to deliver real noise reduction.
Simple and Powerful
The main focus for Sagelight has always been to blend high-end, professional results with simple, yet powerful controls.
Sagelight’s Noise Reduction is no different. With just a one slider, you can define how Sagelight reduces noise in your image. Add just one more slider and you can refine those results.
Switch into Pro Mode, and you have complete control over many aspects of Sagelight’s NR algorithms, as well as how Sagelight looks at and even shapes the edges in your image. See some of the examples below.
As with most Sagelight functions, Sagelight’s NR engine is written in multi-processor-oriented SSE4 code.
Noise Reduction and Image Smoothing
Before continuing, I want to take time to note the difference between image smoothing and noise reduction. Noise Reduction is meant to remove the noise from the image and leave the details behind. In fact, mathematically, a noisy image is seen as two images: The non-noisy image + a layer of noise (i.e. NoisyImage = A+B); the idea in noise reduction is to find B and subtract it from the NoisyImage, leaving behind the non-noisy image as closely to the pure image as possible (i.e. image A).
In Sagelight, you can control the amount of noise reduction and smoothing.
The addition of a smoothing factor vs. pure noise reduction is becoming much more of an issue as image sizes become bigger and cameras are now delivering images with less noise. Smoothing is also a part of how we look at “noise reduction” overall. Smoothing is when small details — such as moire patterns or irrelevant details on an otherwise smooth surface — are removed from the image without touching details we want to keep, making the image look clean and vibrant.. While not specifically removing image noise, smoothing provides a very useful and necessary function of the overall noise-removal process, as well as a separate – but very useful – function for images that aren’t noisy from a traditional perspective.
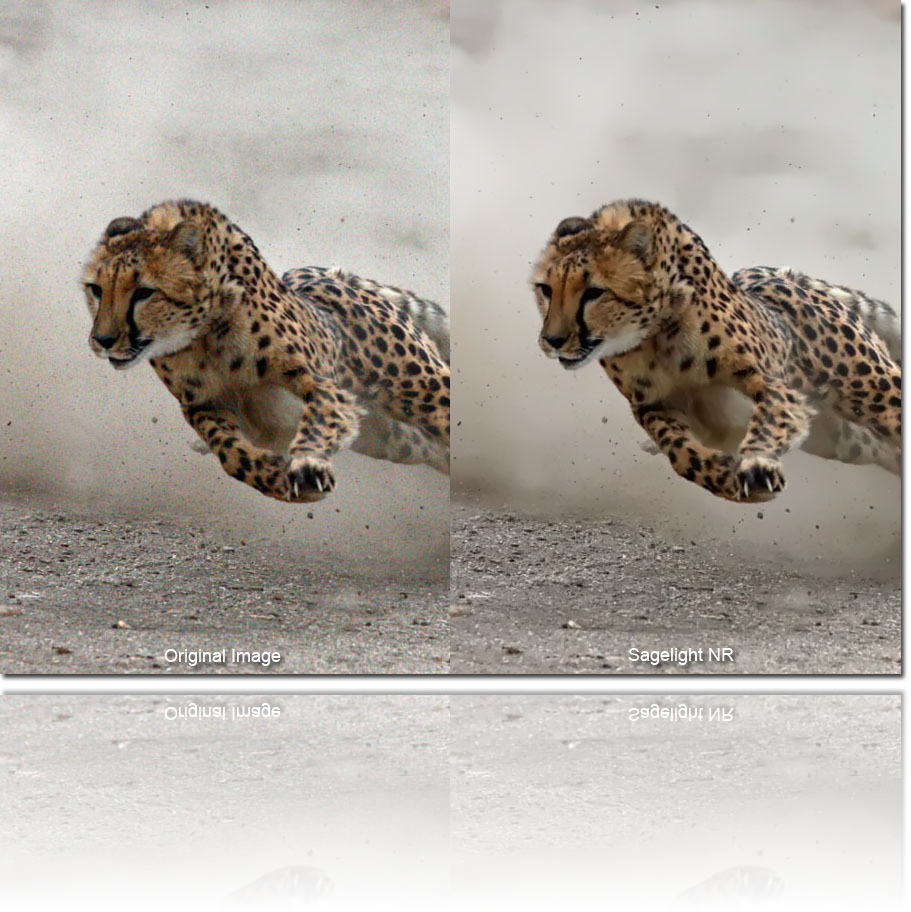
For example, in the image below, the noise is removed, but the background (behind the details) is also purposely smoothed a little. This allows the foreground to stand out, making the tiger more visible and present in the image. With a little smaller setting on the Background Smoothness Slider in the Noise Reduction Controls, the background would be less smooth.
Smoothing is typically a personal choice, and Sagelight sets a level of smoothing automatically which you can control. Sagelight sets a smoothing factor because almost all images look much better with some amount of smoothing once the noise reduction reaches a certain level.
This is an example of Sagelight Noise Reduction working. In the above example, the noise has been removed, leaving the background nice and smooth with sharp details left in the foreground. No post-sharpening or other augmentation outside of the noise reduction was used on this image.
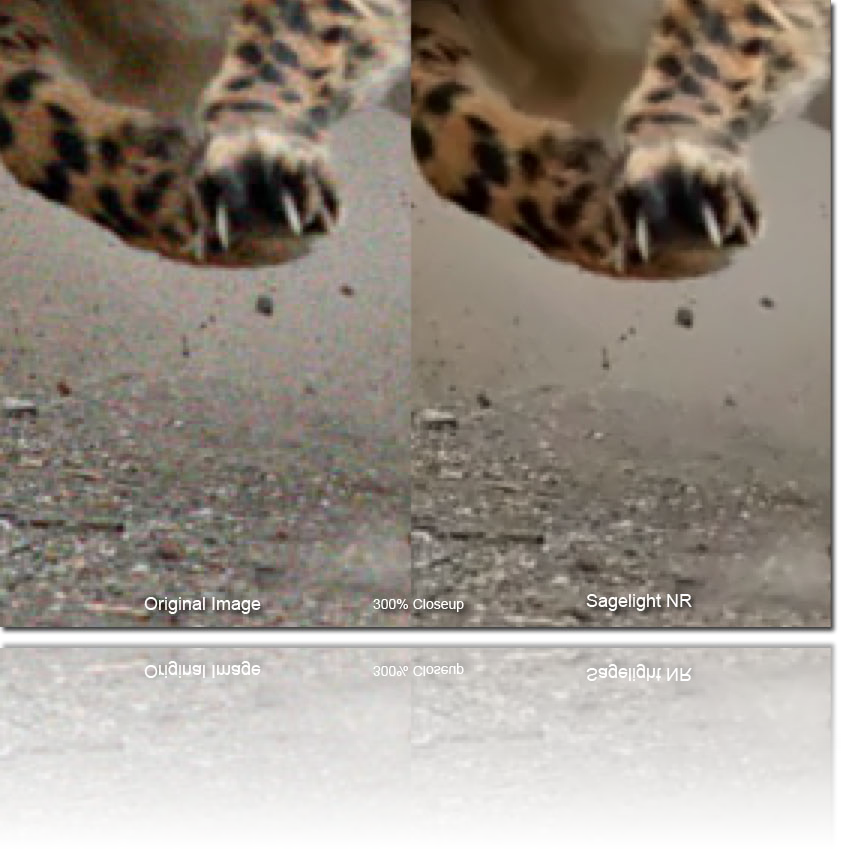
In this 300% closeup, you can see the foreground details being protected and the color and monochromatic noise removed. The details on the cheetah and the foreground are as sharp as the original image. While it is impossible for any noise reduction method to promise to do this in all images, Sagelight’s Edge & Detail Controls help to keep the details and let the noise reduction do its work. Some color was added to the above example to compensate for the color noise removal.
Soft and Natural DCT-based Noise Reduction
If you’ve experience a few noise reduction products, you’ve probably heard of DCT noise reduction. Sagelight’s DCT mode can reduce the noise and keep the details from looking blocky, returning soft and natural results. Overall, DCT16 is one of the best methods to simultaneously clean and smooth noise, while keeping foreground details – all without creating edges that look artificial or leaving edgy artifacts, which is common any many noise reduction techniques.
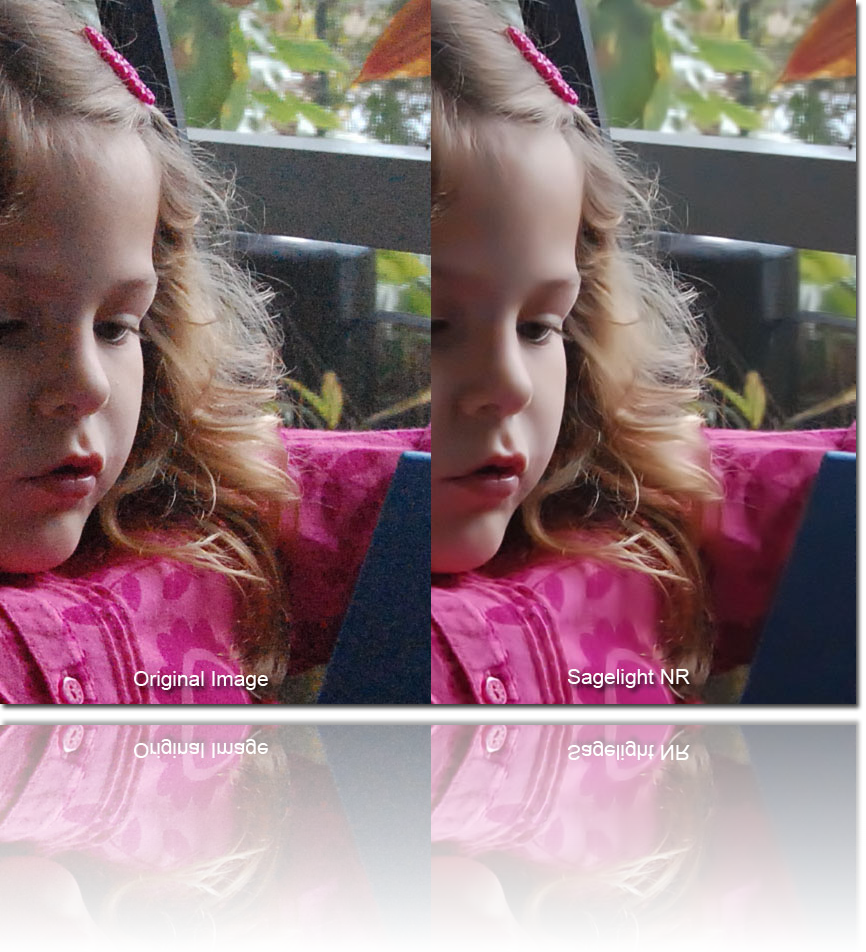
The above example was noise-reduced with Sagelight’s DCT16-based methods. This is a fairly noisy image, and with the detail analysis controlling the noise-reduction, plus the Edge & Detail Controls, the image is nice and clean and contains sharp, original details. Notice the single strands of hair by the window.
In this example (as well as almost all examples presented here), either some of the original image (i.e. the Transparency Control in the Noise Reduction) or some noise would be added back to the image. Removing noise can often make an image look too clean, since we’re used to seeing a little CCD or film grain in images. In addition, a little noise can have a nice aesthetic effect. With the Sagelight Noise Reduction controls, the default is to blend back a little bit of the image. You can change this setting to fit each image.
NL Wavelet Noise Reduction and Smoothing
Sagelight also has an NL Wavelet noise-reduction option. NL Wavelet works well to remove noise and keep crisp, sharp edges. It can remove background noise without touching a single detail.
In the image above, the background noise is removed without changing any details in the foreground; a particular strength of NL Wavelet noise reduction
Different than DCT-based noise-reduction, NL Wavelet NR can give a crisper, cleaner look, avoiding edges better than DCT and also smoothing background elements to a higher degree.
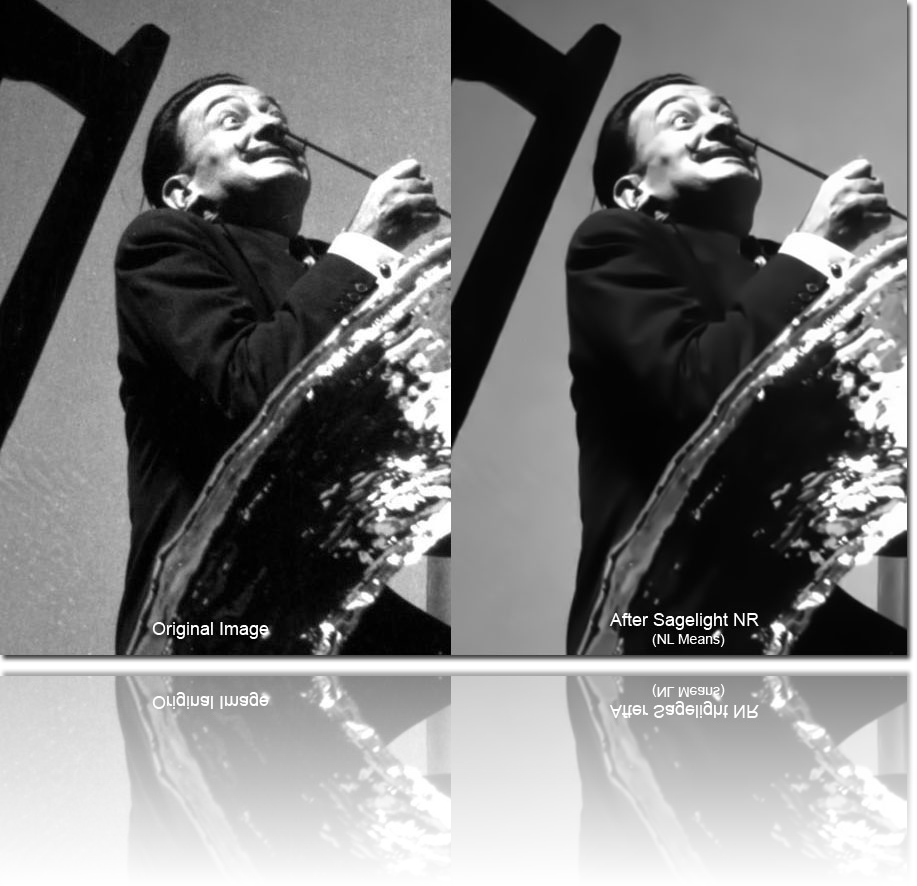
In the above two examples, you can see how NL means cleared out the background. This is not technically noise reduction, but image smoothing, at which NL means excels. Most of the elements in the background are not technically “image noise”, but scratches, tears, and aging of the original image. Nevertheless, NL Means was able to remove it.
Another great use for NL means is smoothing skin and other elements that make an image look nice and clean (i.e. cars, sky, etc. — anything with wide open spaces surrounded by some detail).
(click for original-size image)
Edge Controls
The above example is another example (along with the tiger) of using the Edge & Detail Controls in the Sagelight Noise Reduction functions. Note that this image is zoomed in at about 400%, so the original text on the wine bottle is actually much smaller than it appears here.
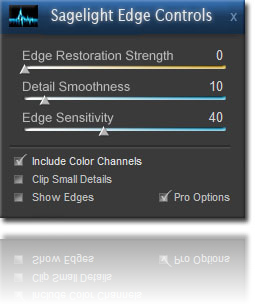
With the Detail & Edge Controls, you can control the following elements of your image:
1. How strong the edges and details are put back into your image
The Edge Restoration Strength control allows you to decide on how strong the edges and details will appear over the noise-reduced image. You can blend them in for just a little touch-up, or put them back in very strong to emphasize the details.
2. The level of smoothness of the edges themselves.
This control allows you to smooth the details as they are placed back into your image. This allows a seamless integration on even highly-smoothed and noise-reduced images.
When an image has a high noise-reduction or smoothness factor, the details can often look unrealistic, noisy, and out of place. The Detail Smoothness slider allows you to smooth the details to blend in with your image much more naturally.
3. What kind of detail is put back into the image, from the smallest details to only the largest.
Sometimes, you just want to put back the edge details, where other times you want to softly put back even subtle details. For example, with a building or outside setting, you may just want the edges of the building and trees, brick outlines, etc. to be emphasized; with faces, however, you might want to blend back smaller details to make the noise-reduction look more natural.
With this control, you can tell Sagelight how small or large the details should be when placed back into the image.
Sagelight Noise Reduction is Great for Previously Edited and Retouched Images
Many times, we come across an image that we (or someone else) has already worked on.
Then, after the editing process, we see noise, or JPEG artifacts. Sagelight Noise Reduction is great for working with images that have already been edited. In the example above, the original image already looks great. But now it looks even better after using the Sagelight NR tools, with a subsequent pass with the Lens Blur to remove some unwanted details.
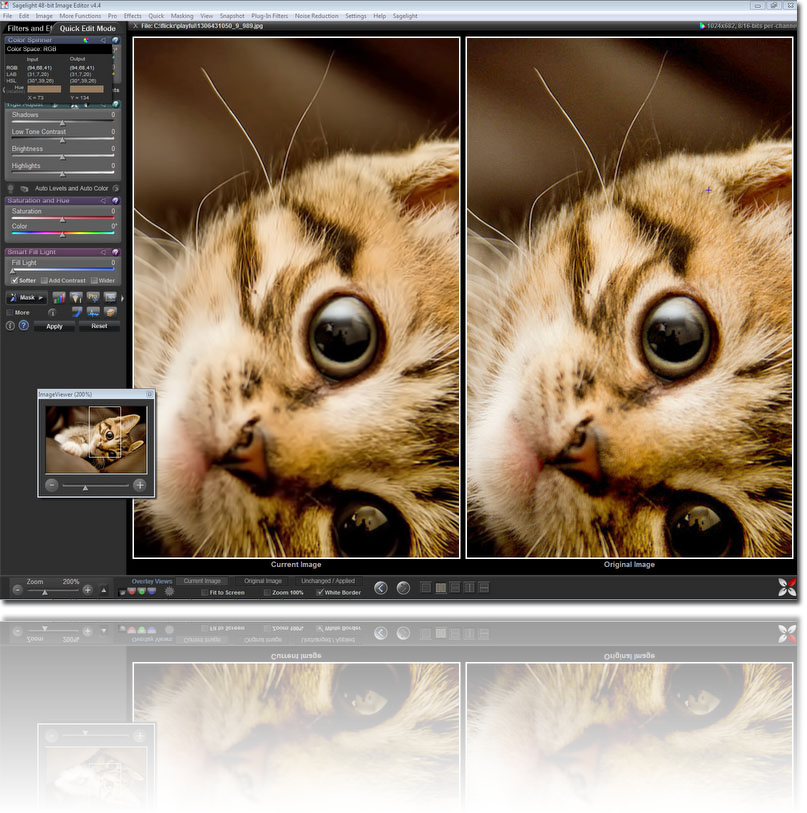
Working with JPEG and resized images.
The above image shows how nice the image looks when post-processed with Sagelight Noise Reduction. Even though the image had already been retouched and edited, resized, and put out to the web, just a simple pass with Sagelight Noise Reduction made it look much better. The whiskers are still nice and sharp, and the background is very smooth.
Even when resized to smaller image, this pays off in a picture that emphasizes the foreground and brings out a more artistic effect with a crisp subject and smooth background.
Very Noisy Images
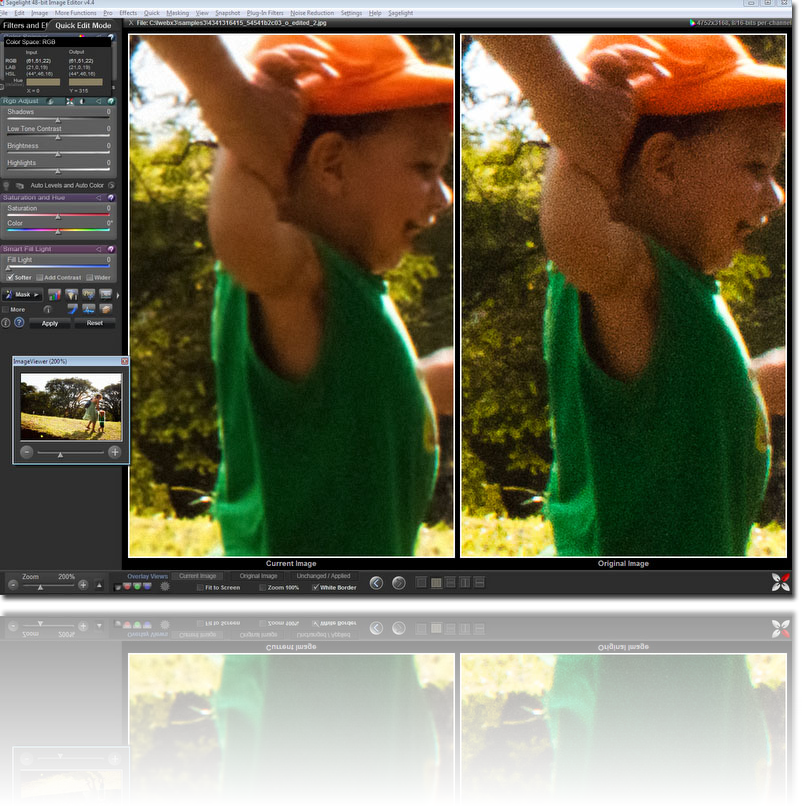
Some images are very noisy. Sagelight’s NR was built to work with the type of noisy of images that come from digital cameras. Some images are noisier than others, especially at high ISO settings. Sagelight works well to remove the noise and preserve the details.
(click for original-size image)
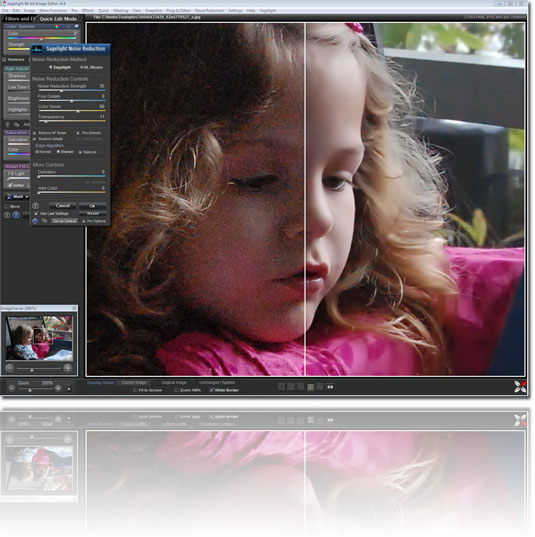
In the above example, some noise was added back to give a sense of grain to the image. After using the Sagelight NR tools, the child now looks just fine, and the details (i.e. the blade of grass in the lower-left) are still very sharp.
Working with BAD In-Camera and Post-Noise-Reduction
Some Noise Reduction (especially in-camera noise-reduction) is low quality and can make an image look artificial. The above example, for instance, looks similar to a still from a Playstation game. This is because the original noise reduction (probably in-camera, but possibly as a post-operation) caused a lot of blocky edges in the image causing it to look unrealistic.
(click for original-size image)
This is a closeup of the original image. It looks even worse at original size (click here to view the above crop it at the original size).
(click for original-size image)
Using Sagelight Noise Reduction worked well to remove the artifacts the original noise-reduction technique left behind, as well as to soften the image and remove the artificial edges. The original size looks even better.
(click for original-size image)
The above image is another example (from the same larger image) of using Sagelight NR to correct problems with other Noise Reduction techniques.
This is another example of operating on an image that was already edited for noise. The original edit cleared out noise above the branches and flower, but there are clear “undo” marks made with a brush to keep the details pure (which otherwise would have been blurry), leaving ugly artifacts next to smooth areas.
A simple pass with the NL Wavelet in Sagelight took care of the noise without touching any details – the entire image could have been completed in one small pass, rather than blurring and using a brush as it was previously edited.
Sagelight NR is great for touching up previously edited images.
HDR Images
Sagelight NL Wavelet noise reduction is great for HDR images, transforming grainy, edgy images into nice, smooth and alluring pictures.
Even when looked at at 100%, the details are very smooth and still crisp. You can control how Sagelight treats the edges and smooth areas in HDR images.
Another HDR example where using the NL Wavelet made a big difference, creating a much nicer image.
Non-Noisy Images
Images that aren’t specifically noisy can benefit greatly from Sagelight NR. The image above was very dark. Bring up the light showed a lot of noise. Gaussian Blurring was used to remove the noise on the outlying areas, and then the NR was used to remove the noise near the edges of the subject, leaving the main image relatively unchanged. The Color Noise removal was also used. Then, a Bokeh blur was applied to the image.
Without the Sagelight NR, this image would have color splotches, and removing the background noise near the subject would have been difficult or impossible.
This image started off without noise, but getting the adjustments to bring it out as a nicer image brought out underlying noise. Using Sagelight Noise Reduction was a very important part of editing this picture.
(click for original-size image)
Smoothing Skin and other Image Details
Sagelight NR works very well for smoothing, both with overall images, as well as skin smoothing.
In the above example, Sagelight NR was used to smooth the skin, and the Edge & Details controls were used to keep all the details. In the result image (to the left), the eyelashes and other details are intact, even though the skin itself has been very smoothed.
Sagelight Noise Reduction Quality, the 64-bit floating-point difference, and The Sharpen Test
Sagelight’s Noise Reduction quality is very high, the core engine written in 32-bit and 64-bit per-channel floating-point. An example of difference between such high-quality and other methods will be shown below. This gives you a lot of options, and can help your image along in the overall editing process, even if it doesn’t strictly need noise reduction.
The image above was sharpened with an unsharp mask at a 1 pixel radius at 1000% percent. Most untouched images would show significant edging and artifacts. Sagelight’s NR, however, is very clean and does not show any edging at all even when sharpened to a high degree.
The Difference Between 16-bit per-channel and 32-bit per-channel.
Even though Sagelight is called a “48-bit Editor”, internally it is 90% a 96-bit editor and sometimes a 192-bit editor. This is because images these days demand it. 16-bit per-channel is still considered high precision, especially over 8-bits per channel (which is never used in Sagelight). However, 32-bit or 64-bit per-channel floating point offers more precision, which can make a difference in your image, even when converted back to 16-bits per-channel (see below)
The Sharpen Test
One of the best ways to see how well an image-processing algorithm works in terms of quality is to sharpen it at an extremely high strength factor, and then look at the smooth areas. For example, try this with Sagelight Bokeh, and then compare it to other products. With Photoshop’s lens blur, for example, you can see square edges ever N pixels, probably leftover from a Fourier transformation (which works in 2^N blocks). With another leading product, you will see ring-like edges where the blur was performed. With Sagelight, you only see what is meant to be in the image, leaving much more to work with as you continue working with your image.
With Sagelight’s noise reduction, a similar test was done and compared to a known noise-reduction product. Of course, no one would (or should) release a non-16-bit noise-reduction, but many noise reduction algorithms are done at 16-bits internally, as well. I don’t want to speak of or for any one product, but some results are below:
The following image (a close-up of the one above) was put into Sagelight NR and a known product’s NR for comparison. This meant to show Sagelight’s quality, and not to deride any other products.
Sagelight Unsharp Mask at 1 pixel, 1000%. There are essentially no artifacts in the smooth areas.
Known Product, Unsharp Mask at 1 pixel, 1000%. It did very well, but some graininess is starting to appear in the smooth areas, which can effect the image later on in the editing process.
Sagelight Unsharp Mask x2 (i.e. done again), at 1000% (therefore, an effective total of over 2000%) percent. Still no real artifacts, just natural contours starting to appear.
Known Product Unsharp Mask x2, i.e. 2000% + percent. Some clear edges are starting to appear, which could start to appear in the original NR image later on in the image edit when other sharpening, contrast, or color is added. This is probably the result of using 16-bits per-channel rather than 32- or 64-bit floating point.
Sagelight Noise Reduction Version 1, and other things to come with Sagelight Noise Reduction
At the time of this release, the Sagelight Noise Reduction function is robust and very effective.
And there is more coming. The noise-reduction research and implementation took quite a long time, and it was important to release the main Noise Reduction utility when it was finished.
However, there was a lot of technology developed in the overall research and development process. There are many functions already finished (just not release candidates yet), as well as others to come based on this research.
Already working (but are not yet prepared for release) are Surface Blur, Remove Jpeg Artifact, General Smoothing, and Skin smoothing functions, as well as some great edge functions that work very well as masks for other functions in Sagelight.
On the heels of this release, now that the base functions are working, is inpainting (which is the function that allows you to draw a mask around something for Sagelight to remove and fill in with seamless detail created from other parts of the image), general smoothing functions useful in other parts of Sagelight (i.e. HDR), and also a third Noise-Reduction algorithm that is pure wavelet-based, which will allow some amazing smoothing and isotropic noise-reduction effects.
Conclusion
Sagelight Noise Reduction is a great solution for reducing nose in your image and keeping details. It is now a standard part of Sagelight’s overall selection of great, professional-level tools. Easy to use, but also powerful, you can use just a couple controls to get the noise reduction you need, or go further and delve into the pro-controls for many advanced options. In both modes, Sagelight delivers high-end, professional-level results.
With Sagelight’s default DCT/Wavelet-based or NL Wavelet noise reduction, both with advanced edge analysis, you can reduce noise, smooth details, and create better looking images, even with images that don’t specifically need noise reduction. Many images that are already fine look much nicer with the smoothing elements of Sagelight Noise Reduction.
Sagelight Noise Reduction also works well to vastly improve images after the editing and resizing process, or for those images that artifacts and edges caused by poor in-camera or other post-process noise-reduction.

![nr-controls2-66_thumb[2] nr-controls2-66_thumb[2]](https://sagelighteditor.files.wordpress.com/2013/07/nr-controls2-66_thumb2_thumb.jpg?w=160&h=512)
![wave-street-screenshot-50_thumb[2] wave-street-screenshot-50_thumb[2]](https://sagelighteditor.files.wordpress.com/2013/07/wave-street-screenshot-50_thumb2_thumb.jpg?w=810&h=813)
![screenshot-yolo-50_thumb[2] screenshot-yolo-50_thumb[2]](https://sagelighteditor.files.wordpress.com/2013/07/screenshot-yolo-50_thumb2_thumb.jpg?w=810&h=813)



![wave-bad-photoshop-fix-screenshot-50_thumb[2] wave-bad-photoshop-fix-screenshot-50_thumb[2]](https://sagelighteditor.files.wordpress.com/2013/07/wave-bad-photoshop-fix-screenshot-50_thumb2_thumb.jpg?w=803&h=798)
![hdr-2_thumb[2] hdr-2_thumb[2]](https://sagelighteditor.files.wordpress.com/2013/07/hdr-2_thumb2_thumb.jpg?w=453&h=905)
![hdr-3_thumb[2] hdr-3_thumb[2]](https://sagelighteditor.files.wordpress.com/2013/07/hdr-3_thumb2_thumb.jpg?w=710&h=713)
![hdr-3-closeup_thumb[2] hdr-3-closeup_thumb[2]](https://sagelighteditor.files.wordpress.com/2013/07/hdr-3-closeup_thumb2_thumb.jpg?w=856&h=781)
![wave-hdr-inset_thumb[2] wave-hdr-inset_thumb[2]](https://sagelighteditor.files.wordpress.com/2013/07/wave-hdr-inset_thumb2_thumb1.jpg?w=547&h=1213)
![non-noisy1_thumb[2] non-noisy1_thumb[2]](https://sagelighteditor.files.wordpress.com/2013/07/non-noisy1_thumb2_thumb1.jpg?w=710&h=851)


