Welcome to the Sagelight Editor Blog

This blog is for things currently happening in Sagelight.  Sagelight Version 4 is now free.

Useful links

Homepage: www.sagelighteditor.com

Blog (same as this one, but nicer): www.sagelighteditor.com/blog

My direct e-mail: rob@sagelighteditor.com

Direct link to version 4 (free) : www.sagelighteditor.com/install_sagelight.exe (28  megs, All Windows versions).

Sagelight Editor Facebook Page An informal place to post your pictures, thoughts, and ask questions.  It was just set up — please “like” it so it can get it’s own username.  note: I will be updating this page in a couple days (11/20/19 or thereabouts)

Youtube Page (with video tutorials — can be accessed on the discussion board, too): http://www.youtube.com/sagelighteditor

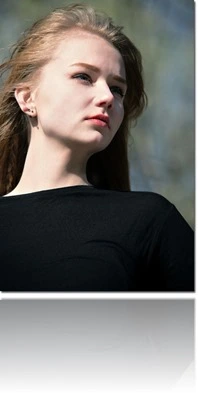
Highlight Reduction on Faces (GIF Example)


This GIF shows reducing the highlights on faces and portraits.  It’s a very quick example, and I will be following up with a Youtube video exploring it in more detail.

CLAHE Highlight Reduction Function

This is an example of using pure Highlight Reduction functionality in the CLAHE Highlight Reduction function in Sagelight (that is, just using the Highlights Slider with the Blend Curve, with perhaps a little of the Details Slider) 

It works so well for effective-yet-simple highlight reduction, I will probably make it a separate feature.  The CLAHE (an HDR detail function) part of it (the Details Slider) can be used for some nice detail and contrast, but is mostly subdued here.  I will get more into the in the YouTube Video

Specialized Sagelight Curves (that Model the Human Eye)

I’ve talked about these curves before, and they’ve become an amazing part of Sagelight.  In fact, the headline of this paragraph will probably be the title of a video/blog entry in the next month or so, as I’ve been rediscovering these curves in new development.

These curves work well with HDR functions (as well as generally) and are designed to mimic how the eye perceives and reacts to lighting changes.  This is not my research, but research I adapted for Sagelight.  As time went by, I realized how effective these curves are in adjusting lighting dynamically and how well they work together with different versions of themselves and as additives to existing functionality.

I will talk more about these curves as I implement them in other functionality in Version 5.   For now, they are featured in most of the HDR functions in Sagelight, and — as an example — are the sole reason why Retinex works as well as it does in Sagelight (the subject of another video coming up).

Reducing the Highlights in Faces vs. the previous post entitled “CLAHE Recovery Function”

In this case, you can see how well it removes the overbearing highlights on the faces without touching the rest of the image.

I recently made a post entitled, CLAHE Highlight Recovery Function that showed this same function in a more HDR manner, creating nice lighting effects.

This is a great contrast using the same function.

Disclaimer on retouched images used in examples:
The retouching on this image was done to show various aspects and power of Sagelight Image Editor that you may find useful in your own image editing.
I personally like the before & after result. Since image editing and retouching is subjective, you might retouch it in a different manner,  finding a result more reflective of your own personal artistic style.


HDR Fill Light Example (Space Needle)


This GIF example shows using the HDR Fill light bringing up the shadows a tough area that can visible halos.  When there is a dark area with a lot of lot around it, it is easy for halos to appear.

In this case, the HDR Fill light was able to bring up the shadow without touching the highlights and midtones without creating a halo.

It worked well, so I did it again.  I didn’t really need to do it again, but I wanted to show that it is fine for the image to use the same functions more than once in Sagelight.

Using the Undo Brush

I then use the Undo Brush to remove some of the effect of the second pass of the Undo Brush.

Right before I leave the HDR Fill function (the second time), you can see me move the mouse looking for something — I am looking for the transparency so I can set it at 50%.

To my surprise, it wasn’t there!

Well, I will add that in the next update/bug fix.  It seems like a oversight on my part, but it does show one thing:  you can always use the Undo Brush to remove some of the effect of the previous function, either with a slider to set the percentage, or with brushes on specific parts of the image.

Pro Saturation

I then use the Pro Saturation to bring up the colors.  I really like the orange glow of the sunset, and wanted to add contrast.  I probably should have used the undo brush to limit the blue that appeared in the clouds, but it was just a quick example.

I could have used the saturation in the Quick Edit Mode, but the Pro Saturation features a deeper level of saturation (see the Multiplier Slider when I use it, which adds a very pronounced effect).


Disclaimer on retouched images used in examples:
The retouching on this image was done to show various aspects and power of Sagelight Image Editor that you may find useful in your own image editing.
I personally like the before & after result. Since image editing and retouching is subjective, you might retouch it in a different manner,  finding a result more reflective of your own personal artistic style.


Highlights and Details Function (examples)

(fullscreen isn’t working on the blog.  Click on the full link https://youtu.be/zjoiSAnm9fA to see it in fullscren on Youtube)

Another one of Sagelight’s really nice HDR functions that may not be as visible as it should, since it’s not part of the Quick Edit Mode.

The Highlights and Details function brings out the shadow areas in your image without touching the highlights, using HDR technology. It can also bring out many details in your image.

This example shows two images, one that brings out the shadow areas easily, and the other that shows the “Details” part of the function, bringing out some great detail and creating effective lighting.

Sagelight 4 is now free. It’s continued development and updates are 100% based on donations through http://www.sagelighteditor.com/donate.html

CLAHE Highlight Recovery Function (Examples)

(fullscreen isn’t working on the blog.  Click on the full link  https://youtu.be/rd1tjBjlVG4 to see it in fullscren on Youtube)

The CLAHE Highlight Recovery function is a great HDR functin and one of the HDR functions added to Sagelight 4. It’s of many functions I want to highlight with Sagelight 4, now that I am back and can show some of its great functions that may not be as easily seen when its not in the Quick Edit Mode.

This video shows two examples of how the CLAHE Highlight Recovery can really bring out elements in your image!

Sagelight 4 is now free. It’s continued development and updates are 100% based on donations through http://www.sagelighteditor.com/donate.html

Sagelight 5 Preview – Equalizer Function

(fullscreen isn’t working on the blog.  Click on the full link https://youtu.be/CP0gOcBMF9E to see it in fullscren on Youtube)

This video shows the Equalizer Function that is a central part of the Quick Edit Mode in development for Sagelight 5. This function is an HDR function that I took from various parts of Sagelight 4. The Equalizer does some amazing things in various ways to images.

This is Part 1, showing on image, and I will upload parts 2-3 in a few days showing more images.

Sagelight 5 is not yet released, and its development progress and pace is based on donations made through http://www.sagelighteditor.com (and Paypal).

A Couple Quick GIF Examples

I’m trying a new thing with putting out quick examples, in this case in .GIF form on Gfycat.  Rather than the longer videos explaining how functions work at length, I am putting out much shorter examples that spotlight parts of Sagelight based on changing one image. This allows me to show some specific feature of Sagelight and to create shorter exampls that make it easier to see the unique features of many Sagelight functions.

I will be posting these on Youtube, and am creating even shorter and more directed versions through Gfycat.com, which I can post inline here and in other places.

Click on the image to see in 1920×1080 fullscreen.  Don’t forget to press the SD/HD button for high-definition!

Power Curves Example — Birds and a Nest against a Blue Sky

https://gfycat.com/hollowfantasticamericanbobtail

In this example, I am using the Power Curves, which is a very powerful function, and will no doubt be the subject of a few more examples.

In this case, I want to deepen the sky in a way that makes it darker, but not fake looking.  With images like this one, with a bright area with foreground objects, it can be hard to change the background area without generating halos.

The Power Curves allow for masking, so tha I can just select the sky area and change it.  Once the area is selected, most of the video is me using the RGB (i.e. light) curve to adjust the darkness of the background, and the saturation curve (i.e. how much color) to adjust the deepness of the color.

The Power Curves work in many spaces, such as RGB, LAB, LCH, HSL, etc.  In this case, I use a simple RGB set of curves, which also adds the ‘C’ curve, to adjust the saturation with its own curve.

Sagelight Version 5 – A Quick Example of the Contrast Function

https://gfycat.com/hatefulpeskygreathornedowl

Sagelight 5 is currently in development and features a completely revamped Quick Edit Mode.  I will be doing a series of videos to show it as I am building it.  This will help get feedback and pointers from users as I develop it.

In this case, I am showing off the Contrast Curves, which adds some new technology and control to Sagelight.   I will be posting a longer version on YouTube shortly, and will describe it more in that post.

This .GIF version shows how fast it can be done with more control, and then also uses the new Vignette slider in the Quick Edit Mode, as well as the Smart Light Function that has always been a great feature of Sagelight.


note: Please let me know what you think of the Gfycat feature.  I am looking at compiling a lot of examples and then having them as a separate feature inside of Sagelight for quick video tips.


SAGELIGHT IS BACK — AND ITS FREE

After a long hiatus, Sagelight editor is back.

Version 4 is now free, which is something I’ve wanted to try for a long time — give away Sagelight (or a version of it) and see of the pay-what-you-want/donation model can work enough to support Sagelight.  I’m looking at a donation model for version 4, and it would be great if it works.

I am currently writing Version 5 (which is about 70% completed), which has a lot of new changes, including a newly-revamped UI about which I am excited.

First, I want to get Sagelight back on track. I established the discussion board at www.sagelighteditor.com/discussion that explains a few things, including why the site went down. The short story is that it was due to a long-term terminal illness with my father and some predatory family members that weaved a considerable amount of destruction through the family and all of our personal lives. It is all over now, and this allows me to get back to Sagelight, for which I have developed a lot of new features and code.

On the discussion board, I also discuss version 5, and the new release of Version 4 as a free piece of software. This is the latest version with some bug fixes and some changes. See more on the discussion board.

If you are a previous owner of Sagelight, download this version as an update.  It’s exactly the same except for the bug fixes and a few changes.

I will be filling out this blog in the next few days (after Thursday). In the meantime, please feel free to download Sagelight Editor by going to www.sagelighteditor.com and clicking on “Download”. Please report any bugs!

Rob

Light Blender Blog: Vivid HDR Preset (that you can download)

dog-closeup-600


The Vivid HDR Preset is a preset you can load into Sagelight.  Just download it and then use it on any image in the Quick Edit Mode.  See below for details on how to load the presets and use them in Sagelight.


Natural HDR and the Light Blender

The Light Blender in Sagelight is a very powerful tool and is a great for natural HDR results.  Where other HDR functions (including those in Sagelight) can give an HDR look-and-feel, the results can sometimes  be harsh and look more artistic than realistic (depending on how you use it, anyway).

The Light Blender is rooted in a true HDR base algorithm, bringing out the range of your image in a way that looks more realistic.  The Light Blender’s main purpose is to bring out the shadows and bring down the highlights to give a good, broad range to your image, reducing severe highlights and shadows.

plane-new-600_edited-title(Before and After Image of Light Blender Natural Vivid Preset)


Natural HDR, in General

I have been working on many ‘natural’ (i.e. realistic-looking) HDR aspects of Sagelight lately, and the release of the Vivid HDR preset is one of many elements I am adding to Sagelight, and the first of a number of presets for the Light Blender to work with natural-looking HDR.

With the latest efforts in development and cameras these days, HDR – that is, natural HDR – is a very big component of digital photography.  New cameras have HDR modes, and even for those that don’t, using a single frame (instead of 3 or more)  — even a JPEG — as a source is now completely realistic.

The idea of HDR, natural or artistic, is no longer limited to those with the right expertise, equipment or specialized software.   This really has a lot to do with the growth of technology in image editors like Sagelight, but also in the sheer quality of the images being returned by today’s cameras.
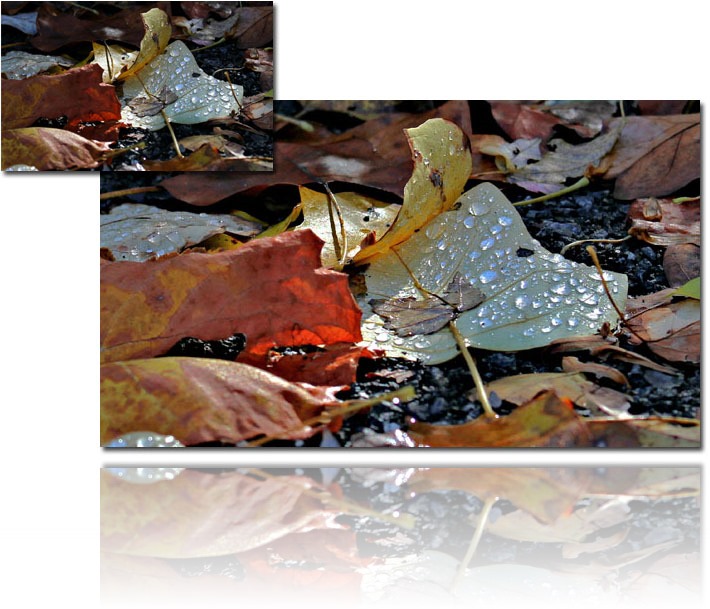
 

leaves-vivid-600-title

(Another before-and-after example of the Vivid HDR Preset)

Full Range of Light and Colors

When used correctly, a natural HDR effect can bring out the image the way the eye sees it.   Our eyes continually adjust to the light, and we tend to see the shadows and highlights, where the camera sees more washed out highlights and darker shadows.

There is also the element of the harshness of the light on the subject, depending on the angle of the sun or other light sources.  Natural HDR can take that mid-afternoon shot, with its bright, white-ish highlights and deep shadows, and turn it into a shot that has the color and range of a late afternoon or early morning shot!

The Light Blender Vivid HDR Preset

The two above examples are basic before-and-after examples of using the Vivid HDR Preset.

This preset works by bringing out the range of your image.  You may then change many different settings, including the curve/equalizers.

Getting Halo-Free Results

A big part of bringing out the dynamic range in an image (especially around areas of contrast and shadows) is halos – those darkened or light areas that tend to make a picture look unnatural.

The Vivid HDR preset works without creating halos, but subsequent definition and focus levels can create small halos, sometimes visible.  There is a way to work with halos, and I will outline these later in this article.  See the “Getting Halo-Free Results Continued” section below.

Downloading the Presets

To download the presets, download the following .SLP files.  You can place them anywhere on your system, and then load them through the Quick Edit Mode Preset Function.

Using the Light Blender HDR Preset
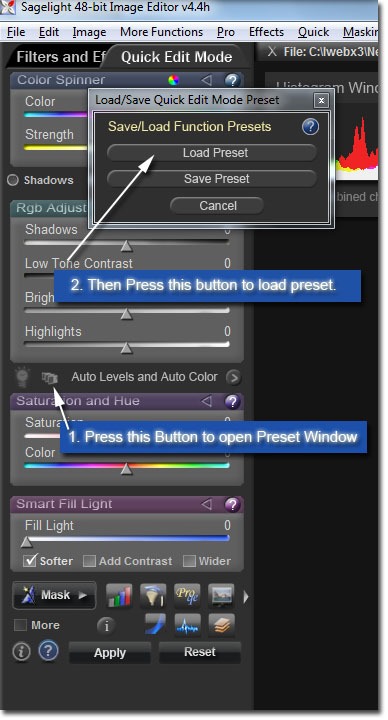
 

presetgraphic

To use the preset, simply press the Preset button in the Quick Edit Mode (Step 1).  Then press “Load Preset” (Step 2).

One you press “Load Preset” go to the directory where you put or downloaded the presets.  Then you will see a screen similar to this:
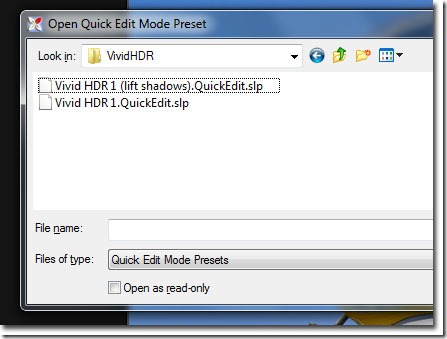
presetwindow

Simply click on the preset (i.e. “Vivid HDR 1”), and you will see your image change to reflect the range of your image.

There is also the “Vivid HDR 1 (lift shadows)” preset, but lets stick with “Vivid HDR 1” for now.
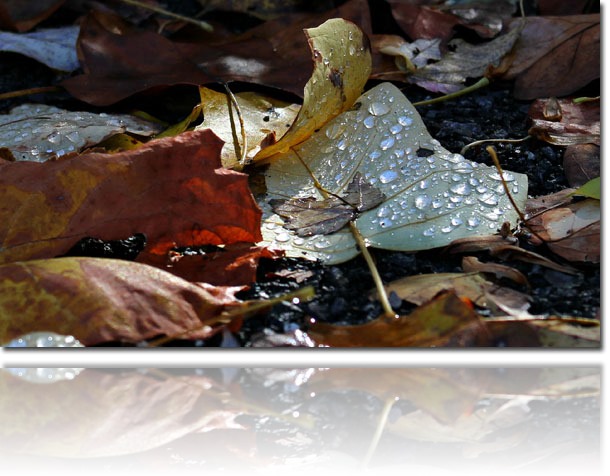
leaves-org-600

Using the Preset

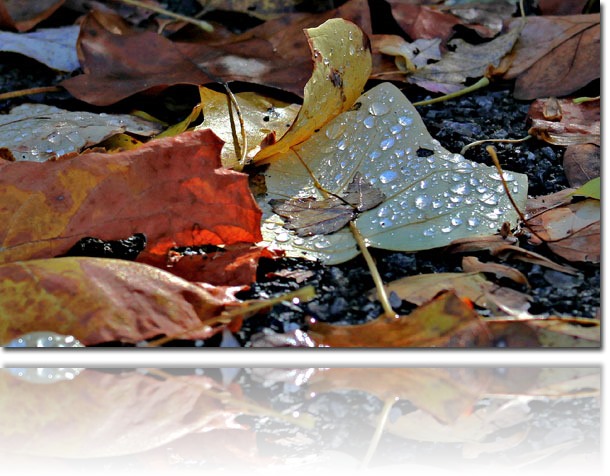
Let’s take the above picture of the leaves as an example.  Follow the steps outlined above.
leaves-vivid-600


When you load the Vivid HDR curve, this is the result.  You don’t really need to do anything else.   You can then use the Vibrance and other controls.

Use the Apply Button and Smart Light

Sagelight is non-destructive to your image in this process. Sagelight is also based on re-using controls.  You can then press the Apply button to lock these changes, so you can do more with your image than you could with just one set of controls.

After this, you can use many other controls to really bring out the light in your image.  The best control to use after using the Vivid HDR Preset is the Smart Light (the Light Symbol in the bottom-left of the Quick Edit Mode).  Inside the Smart Light, try using the Midtone Contrast with the Highlight Slider.
lighthouse-org-600

Another Example

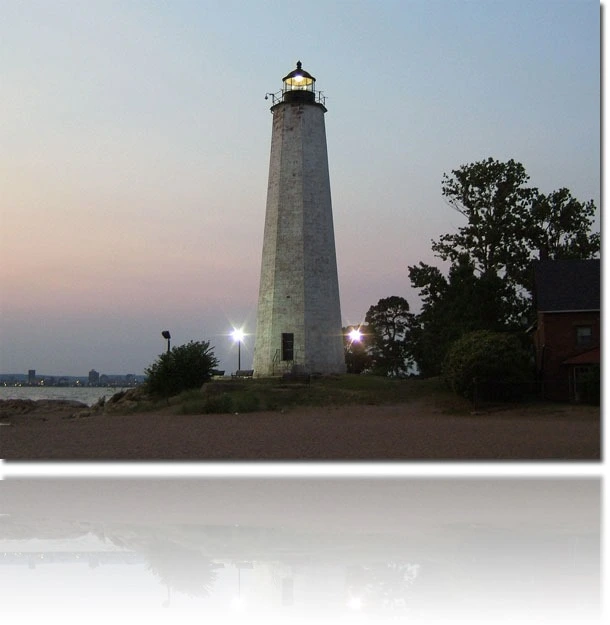
The first example with the leaves worked out great.  There really wasn’t much to do with it.  This isn’t true for all images.  For example, the image above (the Lighthouse) is dark. 

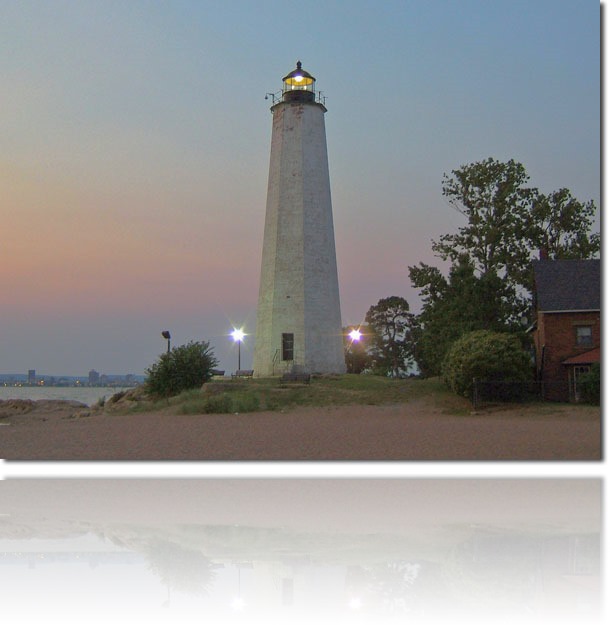
Load the Vivid HDR preset with this image, and here is the result:
lighthouse-vivid-hdr

You can see that the range has been brought out, both by deepening the highlights and bringing up the shadows.   But, it’s still a little dark.

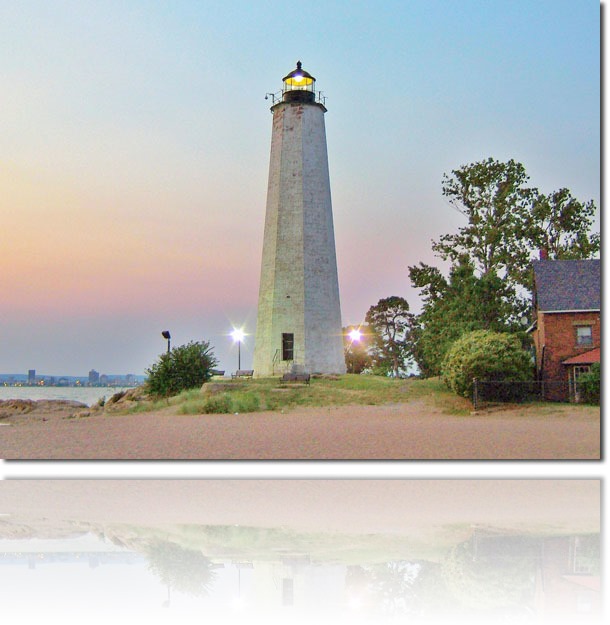
I can get a great image by pressing the Apply Button and using the Smart Light Controls, as suggested above.
2674994140-vivid-hdr-SmartLight

The above is the Vivid HDR preset after I used the Apply Button and a single pass in the Smart Light. I can then fine-tune the image to get what I want, such as contrast, more color, and so-forth.

If you look very closely, you can see a feint trace of haloing in the trees, and possibly on the sides of the lighthouse.  These are barely noticeable, but sometimes can show up if you do further editing.

Most of the time, small halos aren’t a problem and you would only know they are there if you were comparing the image directly to the original.

However, there is a way to work with the Vivid HDR Result that – as other functions are used (such as the Definition controls) – generates no halos whatsoever! See the section below, entitled: Advanced Techniques: Working with the Vivid HDR Result Curve.
vividwindow

Working with the Result: Using the Light Blender Controls

You can affect the result greatly with just a few tools in the Light Blender and Power Box.

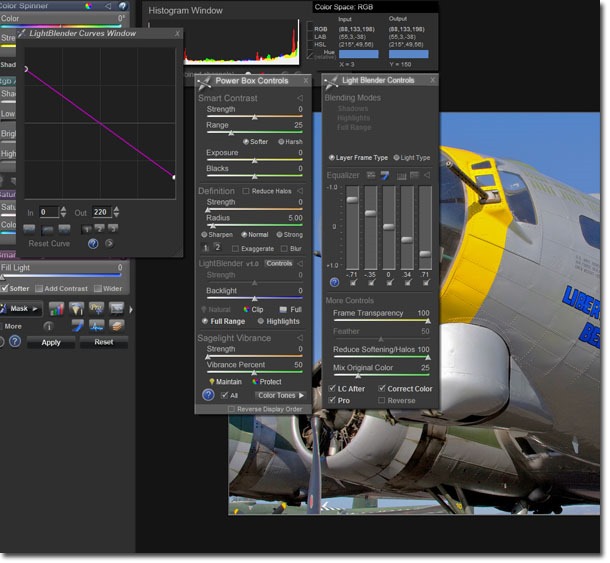
When you load the HDR Vivid Curve, the controls in the screen above show up.

You can dismiss the LightBlender Curves Window – just click it off (it really shouldn’t be showing up; it just does that when the preset has changed the curve, which the Vivid HDR preset does).

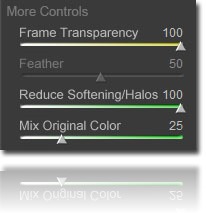
The other controls, however, do some great things with the result:
LightBlenderMoreControls


Frame Transparency and Reduce Softening/Halos

These two controls work together for a great effect.  Move the Reduce/Softening Halos to increase the feathering – this can add definition and make your image look more natural.

Simultaneously, try sliding the Frame Transparency – this will brighten your image.

When used together, these can create a nice, bright, natural image, even when the initial result doesn’t look the best.

As you move the Frame Transparency Slider, you can also lose definition.  Use the Definition Slider to compensate (see more below)

Mix Original Color

When you use the controls, the image can start to look very colorful – sometimes in an unnatural manner, as the new bright shadows have more color than they need. Sometimes this works in the opposite direction, and not enough color is brought out from the image.

Use the Mix Original Color slider to compensate.  As you move the slider to the right, less color is added from the original image; as you move the slider to the left, more color is retained. 

You can also use the Saturation and Vibrance controls.
DefinitionControls

Using the Definition Slider (or avoiding it)

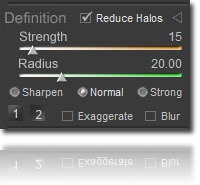
When you use the Vivid HDR preset, the Focus is set to 15 (make sure #2 is pressed; this is the focus, where #1 is the definition and is not set).  This is set because the Vivid HDR brings out the dynamic range, which reduces definition.

The Focus Control brings back the definition, but can be at the cost of some slight edging or halos (usually this isn’t the case, and you can set it to 0 and back to 15 to see the difference).

In some cases, you might want to avoid using the Definition and Focus controls until after you’ve edited the image for light and balance.

As you use the other controls (such as the Frame Transparency Slider), you can reduce or increase both the Focus (#2) and Definition (#1) controls to keep or reduce the overall local contrast and definition in your image.

You can use the Equalizer

See Advanced Techniques: Working with the Vivid HDR Result Curve. Below.
 

lighthouse-curve-600


Advanced Techniques: Working with the Vivid HDR Result Curve

(aka Getting Halo-Free Results Continued)

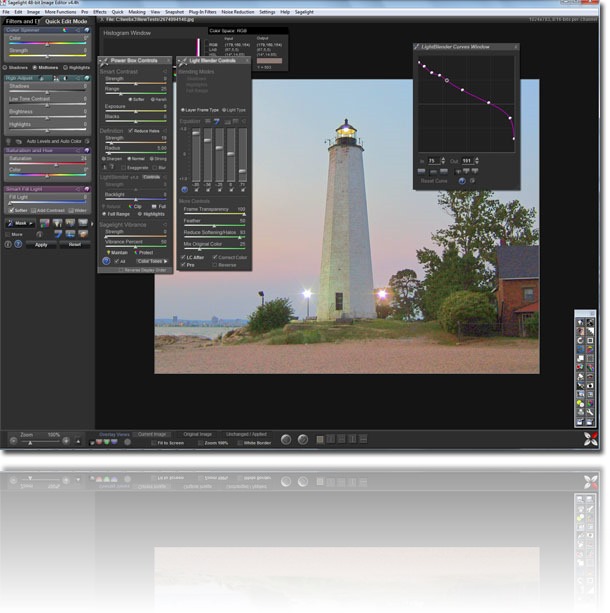
The above shows the screen after you load the Vivid HDR Preset.  You can usually ignore the curve and just close the window.

In the example with the Lighthouse above, I showed where I used the Smart Light function just after loading (and applying through the Apply Button) the Vivid HDR Preset.   However, this generate dsome very feint halos.

You can adjust the Equalizer or the curve itself (by just grabbing the curve and moving it, or using the mouse-wheel on the curve points for greater accuracy)
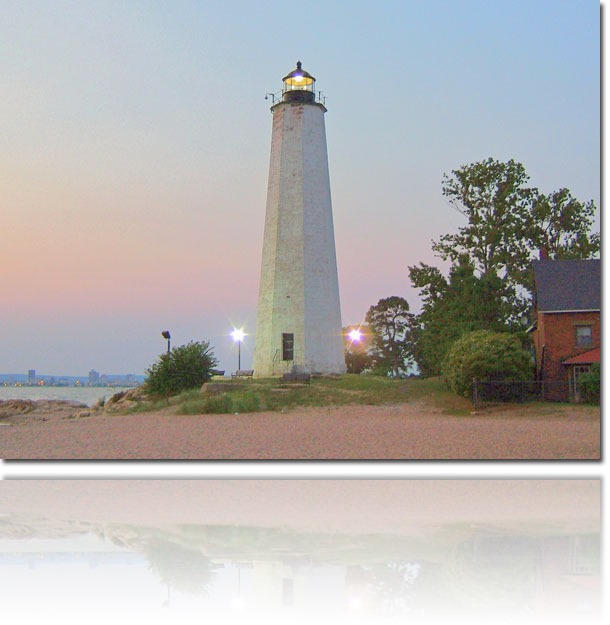
lighthouse-curve-only

The above is the result adjusting the LightBlender Curve (note that the Focus control in the Power Box was set to 0 to avoid halos).  This example is halo-free!
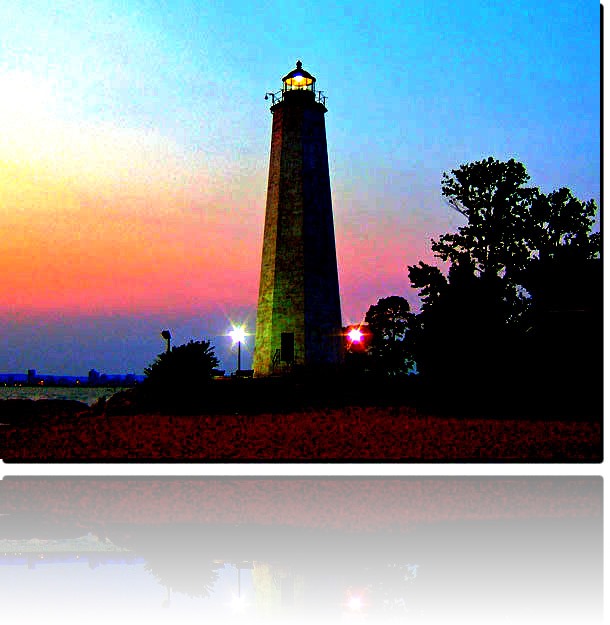
lighthouse-halo-free-zone

The image above shows that there are now halos in the result image (you would see them if they were there in this augmented image).
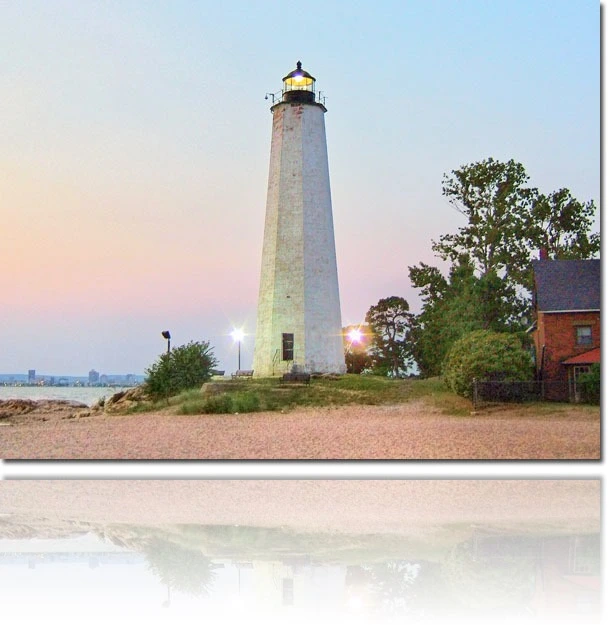
 

2674994140-vividhdr-curve-edit-smartlight-HDR-600

The above is the same image after using the Smart Light Contrast Control, a little HDR, Noise Reduction and the Undo Brush – all still halo-free!

Using “Vivid HDR 1 (lift shadows)” Preset

For some images, you may want to detail the shadows even more.  The “Lift Shadows” version of the preset works well for this.
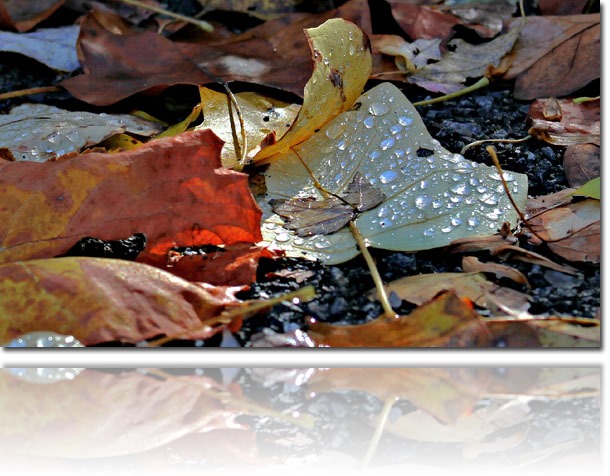
leaves-vivid-600

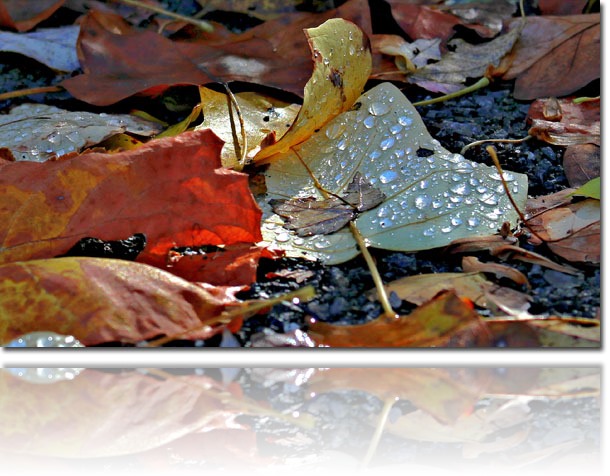
For example, the above image is the result of using the “Vivid HDR 1” preset.
leaves-vivid-shadows-600

This example is the result of using the Lift Shadows version.  If you look closely, you can see more shadow detail in the second image.

On some images, this may make the image too bright in the low shadows – you can just load the “Vivid HDR” preset, or use the left-most equalizer handle to adjust the shadows (or grab the curve in the curve box).
eagle-new-600

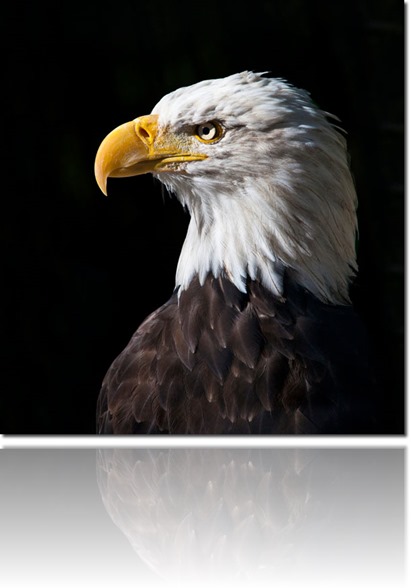
(Original Image)

Restoring Highlights with the Vivid HDR Preset

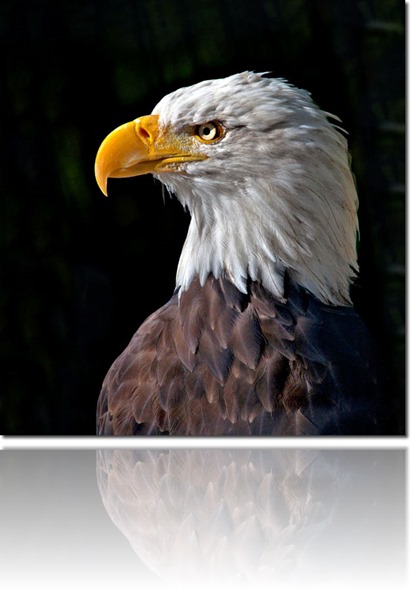
The Vivid HDR preset can help restore highlights.
eagle-vivid-600

In the result image, you can see much more definition where the highlights were blown out before.  The eagle is brighter and more balanced overall.

You can use the controls to add back contrast, add or remove color, and otherwise create the image you want – now with much more definition in the highlights.
 

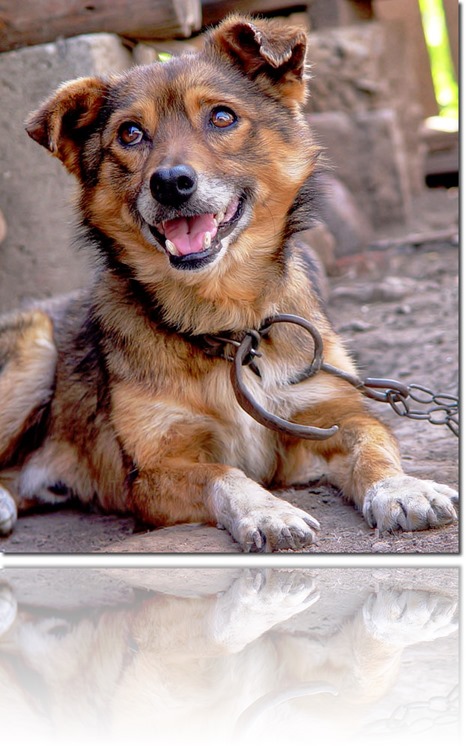
dog-org-600

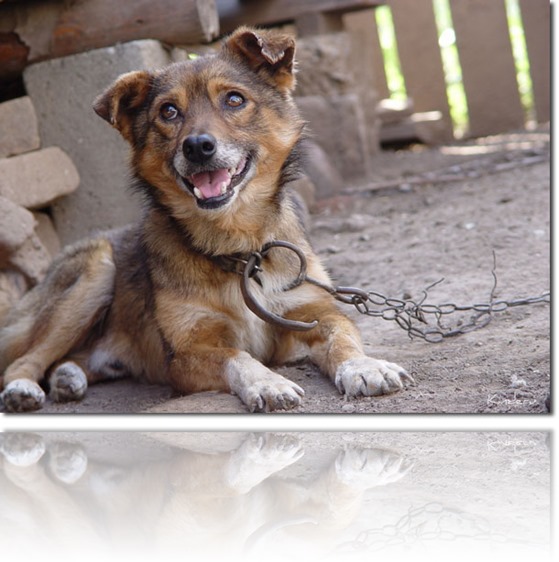
(Original Image)

Vivid HDR is great for Artistic and Natural HDR

The Vivid HDR Preset does a great job of setting up an image for an HDR pass in the HDR Panel or other HDR functions in Sagelight. The result can be a more natural HDR – still artistic and impressive, but not quite as artificial-looking as some HDR.
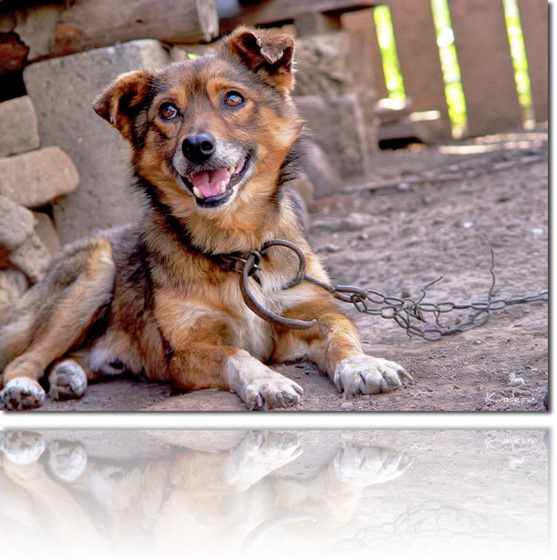
dog-hdr-600

Wit this result, the dog definition as an HDR look, but it also look natural and smooth. A very light pass of NL Wavelet Noise Reduction was also used
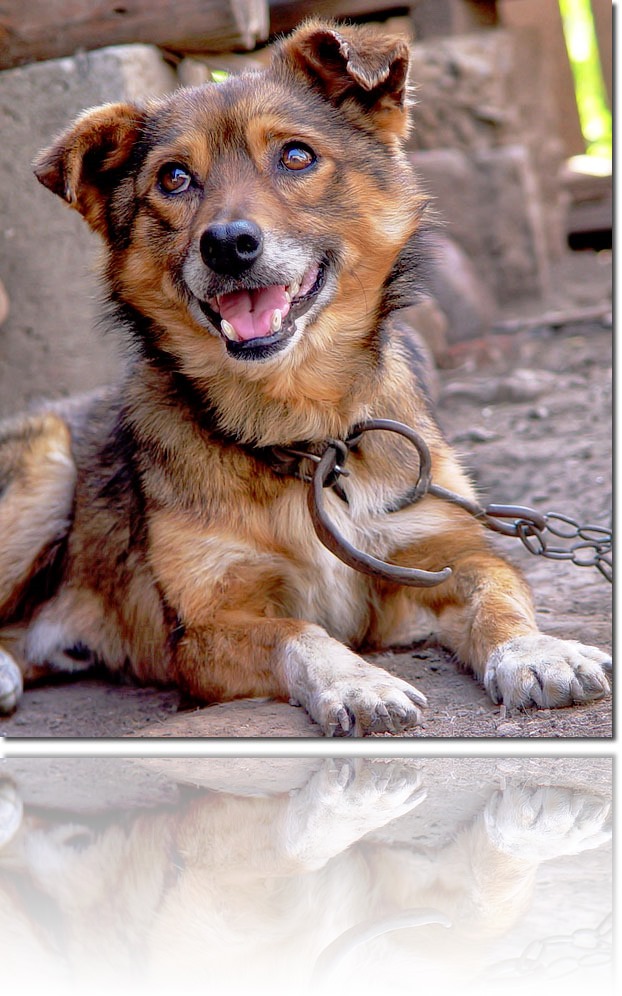
dog-closeup-600

This is a closeup of the HDR image, showing the very high quality and definition of the result!

Keep in mind this is a single-frame HDR image, not multiple exposures.

Conclusion

The Light Blender is, indeed, a very powerful tool.  The Vivid HDR Preset just released is a small part of the Light Blender, but shows how much it can do to help your image.

This is the first of a few Light Blender presets to create natural HDR in your image, as well as help create heavier artistic HDR effects that are more artistic but also with a natural look and feel.

The Vivid HDR Preset helps bring out the HDR elements of your image – both shadows and highlights – so you can create a more vibrant picture more easily.

Once the Vivid HDR preset is used, many tasks become much simple – just use the Vibrance and other controls,  press the Apply Button and use the Smart Light Control to create a great image.

You can go further and use this as a base for more HDR effects, or mixing your image with the Undo Brush for more localized editing.

You can create different and more compelling results by modifying the Vivid HDR curve and using the Frame Transparency and Halo Reduction Sliders.

This preset will appear in the Light Blender as an inline preset when the UI is updated. 

For now, try it out and see what you can do!

Up Next: Light Blender Natural HDR:
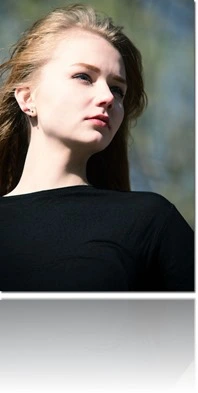
portrait-org-500portrait-vivid-feather-500-2

(click on images for larger sizes)

In the next release, a new preset which has a great natural feel to it.  The next Light Blender preset release will help you to automatically get very natural HDR effects out of most images – just by loading the preset. 

Rob’s Cell-Phone Blog: The New Era of Cell-Phone Cameras (and Lens Blur, Part II)

20140529_105130_edited-700

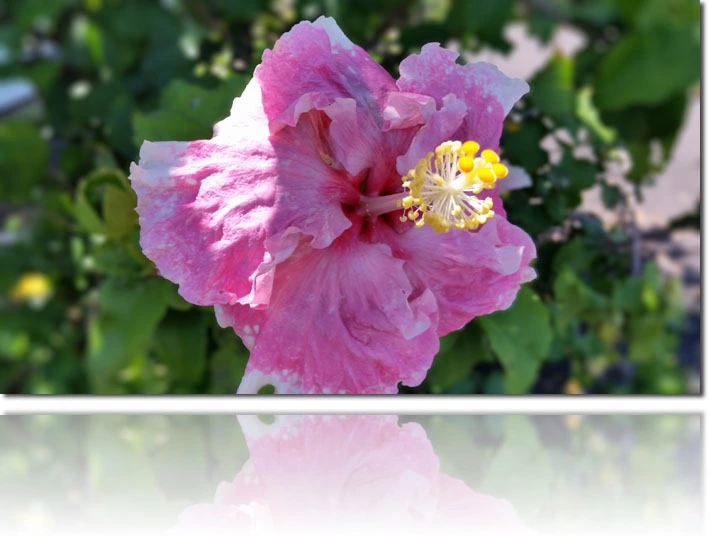
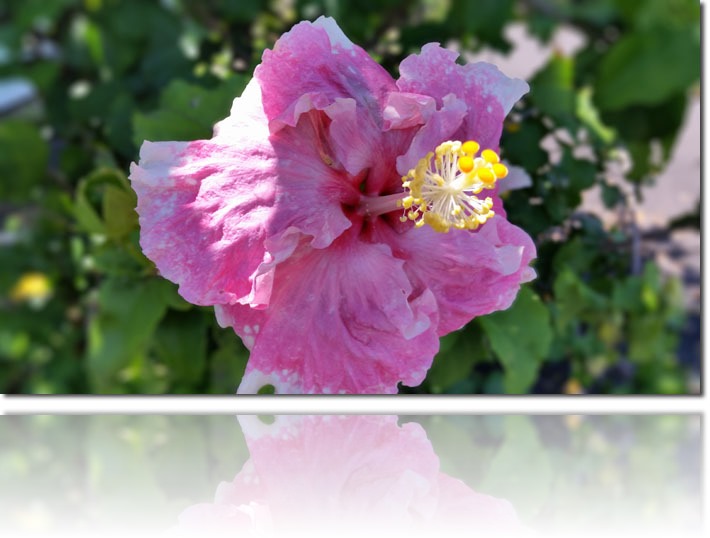
Flower Taken with my Galaxy S5 16MP On-Board Camera (with virtually no touch-ups, save one – Lens Blur / Bokeh)


Cell Phone Cameras are Now Able to Take Great Pictures

I just upgraded to my new Samsung Galaxy S5.  I didn’t really need it, but I upgraded anyway for one specific reason: the camera.

The camera in the Galaxy S5 is 16-megapixel and offers great color, as well as a number of modes, specifically an HDR mode (that is, true HDR, not the artificial kind) which allows the camera to take pictures that don’t kill highlights and shadows.

the iPhone has a similar capacity, and both cameras do a great job with panoramas, stitching them basically perfectly (or close enough in some cases) – in fact, a few of the images I posted on the www.cinepanplayer.com site are from iPhone cameras.

Introducing Rob’s Cell-Phone Blog

This is the first entry in ‘Rob’s Cell-Phone Blog’.  The magic of new technology is that it makes such great tools available to all of us.  Now anyone with a cell-phone released in the last couple years can get great pictures – and easily, considering our phones are with us all the time (I think this is one of the main things).

While I am working on the next version of Sagelight, I am going to start posting entries with pictures taken with my cell-phone, as well as those taken with my bigger camera for comparison.

My main purpose here is two-fold:

1. To show that you don’t need to be an expert or committed to expensive equipment to get good pictures.  Of course, the nicer the camera, the better the picture, and – more importantly – the more great pictures you can get.

2. To show that with cameras now returning ready-to-publish pictures, using an image editor such as Sagelight (or Lightroom, Photoshop, etc.) is even more compelling and creative.

As such (with #2), there is something counter-intuitive going on.  At first, it seems that, if a camera can return a great picture, you don’t need an image editor like Sagelight.

Well, you don’t.  And that’s the beauty of it and the part that seems counter-intuitive at first.

The main thing is that you really don’t need an image editor with most newer cameras now, at least in JPEG mode.  And that’s a great thing, because now you don’t have to spend time fixing the image for color and other problems.

That’s liberating, because now you can work on your artistic view of the image instead of what may be going wrong with your image. Now I want an image editor to do the things I couldn’t do with lesser images – those lower-quality, problematic images with contrast and other problems.

My aim is to show that the better the picture from the camera, it really means the more you can do with an image editor like Sagelight.

In fact, for those curious, this is why I have been steadily putting serious and powerful tools in Sagelight over the last 2-3 years (i.e. HDR, Bokeh, Power Details, etc.), because technology is allowing us to be more creative with our image than ever before.


Getting Great Shots Easily

As I mentioned, I am not saying – in any way – that the camera technology appearing in newer cellphones are nearly as good as a camera you would by as a standalone camera.   My Fujifilm SL-1000 is much better than the camera in the Galaxy S5, and I am always going to get better pictures with the SL-1000 than I will with the Galaxy S5 (and, by my rating, the Fujifilm Sl-1000 is only a mediocre camera, mostly because of the horrible JPEG codec, forcing me to take RAW all the time, and effectively making many modes (that won’t write out to RAW) pretty-much worthless).

But, I take my cell phone everywhere I go – with my bigger, standalone camera, I need to think about it; I need to be in photographer mode and out to specifically get pictures.

Now that my cell phone takes some great pictures, I can actually think about them artistically and see them as quality images, where I just couldn’t before except for the picture that somehow randomly came out great with my previous cell-phone.


20140529_105130-700

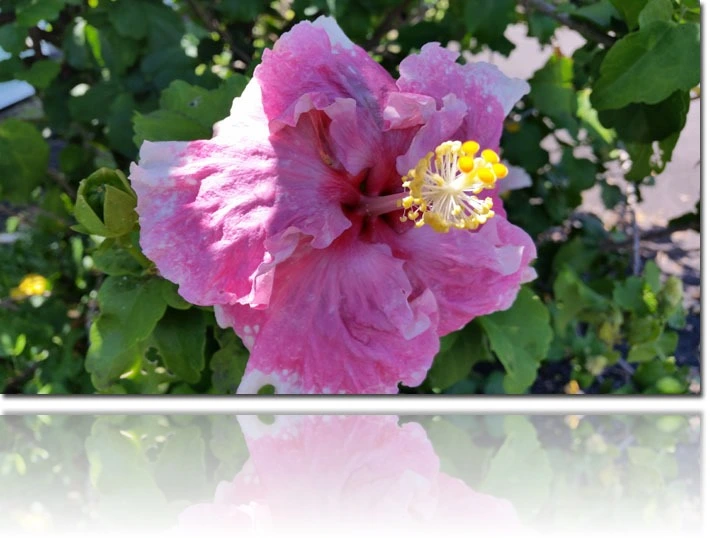
The Original Image

Great Color and Image Quality

The nice thing about the Galaxy S5 camera (and no-doubt the pictures from the iPhone and other cell-phone cameras) is the perfect color.

The image above is the original picture with no changes. 

To me, that’s great – now I can spend more time creating my artistic view of the image rather than fixing it’s problems.

20140529_105130_edited-700

The New Image (again – this is the same image as the top image)

More Lens Blur / Bokeh – Lens Blur Part II

This can be considered a continuation of the Lens Blur post from a couple days ago:

The only change I made to this picture was to add some lens blur, using the techniques I described in the last blog article.  I wanted to bring out the flower into the foreground, especially since some concrete is showing in the upper-right (which I could have removed with the clone brush)

In this case, I created a more accurate mask with the Sagelight Masking and Fill Mask tools, which took about 5 minutes.

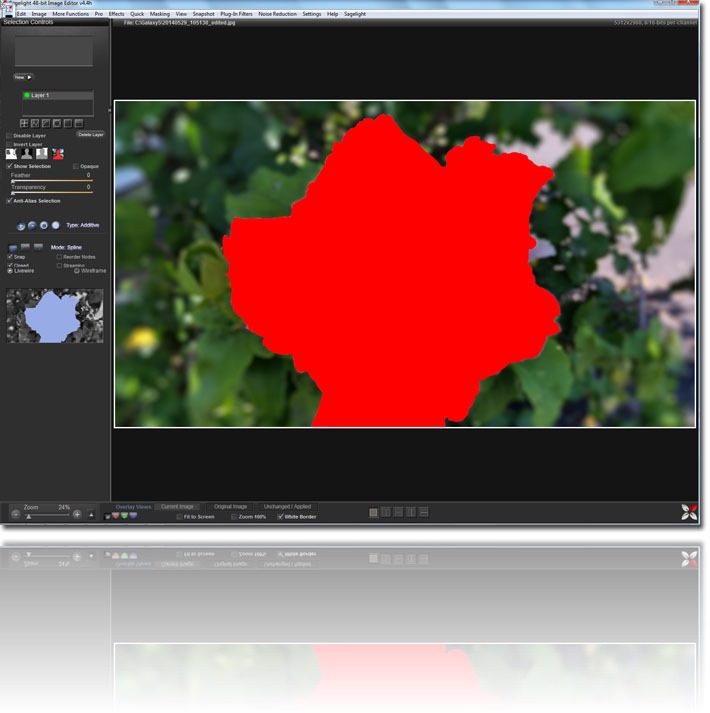
mask-flower-accurate

You can see where I made a more accurate mask.  I wanted to blur the background, but also wanted to keep it looking realistic.

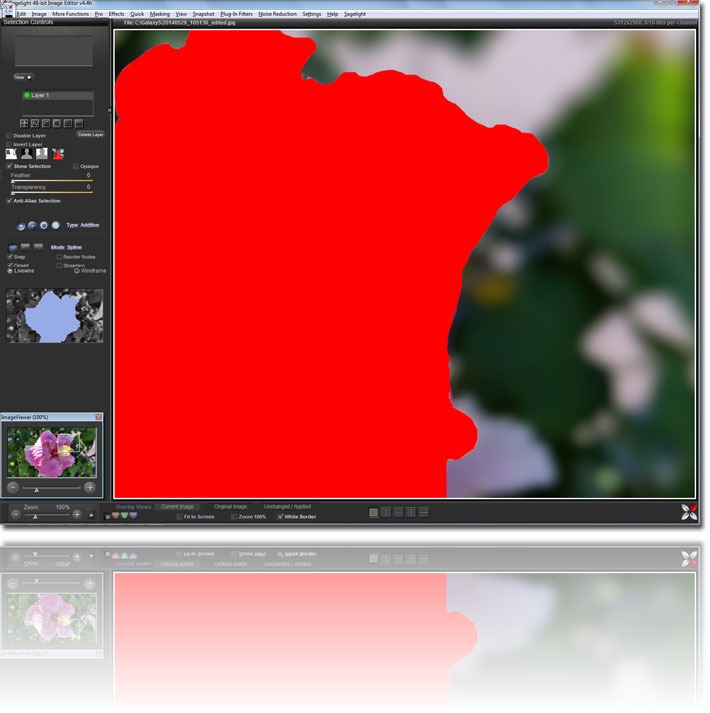
mask-flower-accurate-closeup

Here is a closeup of the selection mask for reference – you can see the Sagelight Masking and the Fill Mask tool did a great job!

The result brings the flower more into the foreground, and now that concrete patch is a little less present as part of the picture.  If I wanted to continue editing this image, here is what I would do (if anyone wants me to do it, I can post it):

  1. Remove the Concrete Patch.  I would just use the clone brush to bring in some of the green areas (from the left) to obscure the concrete.  It’s easy to do and would look realistic.
  2. Remove the Blown-Out Highlight.  The upper-left part of the flower has some blown-out highlights.  I would just use the clone brush (with a low pressure) to blend in some texture from another part of the flower.  Actually, I did this and it looked great.  I must have reverted to a previous version before I did the Lens Blur / Bokeh.

Conclusion

I really like what I am seeing with technology in cameras these days.  Cell-Phone cameras can now take some great pictures, and since we always have our cell-phones with us, we have even more opportunity to take great pictures spontaneously.

Since I don’t always have my bigger and much better Fujifilm camera with me, the quality of my Galaxy S5 cell-phone camera allows me to think creatively on-the-fly when I am just walking by this flower or that rainbow, or wherever.

My larger camera still takes much superior pictures and gives me more chances at a nice picture, but I don’t carry it with me always, and its great to have a camera on me all the time where I can get something great here and there.

With the HDR and panorama modes, it makes life even better:

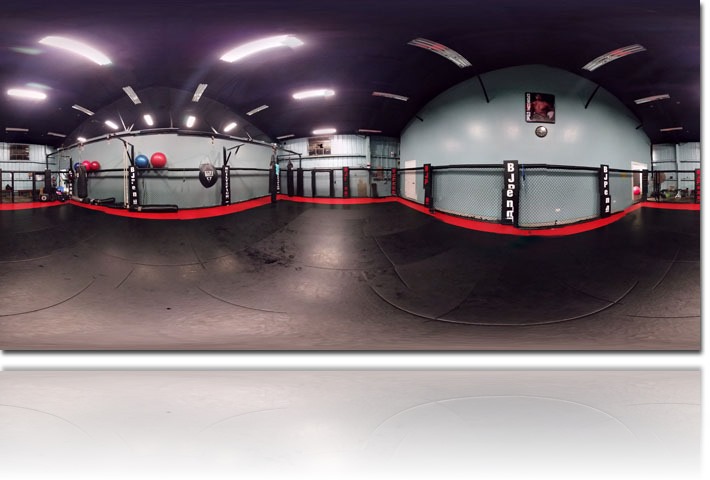
bjpenn-700

BJ Penn Gym, Hilo, Hawaii

The above image was taken with the photosphere program, which is a 360×360 image.  It’s not perfect and has a lot of errors, but it’s great to have.  This picture will never be professional-quality, but I also took in about 2 minutes and performed no post-processing on it.


Now that I can get great images from my cell-phone camera (as well as just about any camera nowadays), I don’t need to worry so much about fixing it and can concentrate on my vision for the image.

This makes image-editing much more fun and creative, when I can deal with a great image from the start – even with my cell-phone.

Programmer’s Blog: The Sagelight Model and Creating an Accessible, Powerful User Interface

Introduction

This blog post started as a response to a post on the discussion board.  The basic question was, “When will there be a prototype of the new UI changes?

My answer started off as a time frame of 4-6 weeks.  I also wanted to point out that I was working on some other UI elements, and then, well, it turned into an interesting discussion, which I thought I would post as a blog entry.

My thought was that I like the new design with the UI, but there is also something else I am trying to work with, which is making all of the powerful Sagelight functions more accessible and useful to everyone, and essentially systematizing the Sagelight Model that provides, quick and powerful, easy-to-use functionality with highly advanced image-editing functions.

(note: this is more-or-less a stream-of-consciousness post, and I really haven’t proofread read it).

Exploring the Sagelight Model – Why Sagelight Exists, Ease-of-Use + Power

As I wrote my answer, I realized that this is a good place to explore the Sagelight Model.  If you’re wondering about it, definitely read on.  This blog will explain the Sagelight Model as well as what is happening with the UI.

Moreover, it explains just how powerful and advanced Sagelight is as an image editor.

Screenshot of the HDR Panel — showing that it can be used for many things, not just artistic-level HDR

The HDR Panel Function as a Great Example of Sagelight Power and UI Considerations

The best example of Sagelight Power and the Sagelight Model (of providing powerful control sets) is the HDR function.  I tend to use the Light Blender as an example a lot, but the Light Blender is so capable in many different ways, it gets to slippery to talk about.  As you’ll see with the HDR function (described below), there is a lot to Sagelight functions, the HDR being representative of quite a few functions (such as the Light Blender, Bokeh, Power Box Tools, Power Details, and so-forth).

The HDR function — that is, the main “HDR Panel” function — is a better example to talk about for this than the Light Blender or other Sagelight tools.  This is because the HDR Panel Function is also very capable, and sorting out how to present it encapsulates what I am looking for in the UI outside of the Quick Edit Mode, and really is probably an epitomical example of the overall scope of many functions in Sagelight, or at least close to one. 


(HDR Controls, in Pro Mode)

An Outline of the HDR Panel Controls – there’s a lot more than you might think!

Keep in mind that the HDR Panel, as outlined here, is representative of many Sagelight Functions and the overall Sagelight Model. 

There’s quite a few controls in the HDR Panel, and there are 3 tabs full of functions.


Programs Within Programs — the automatic layer-based, niche-editor model of Sagelight

Every Control has a very Specific Reason to Exist.

While there are lot of controls in the HDR, every one has a reason to be there.  The idea is that functions likes the HDR panel are programs within themselves — in fact, really separate editors with a specific niche function.  The idea is two-fold:

  1. Do all the things you’d want to do in a program like Photoshop with Automatic Layers.  Typically, if you’re using the HDR, or any other function (such as the Bokeh, etc.), there are more things you’d want to do than just that one function.  For example, if you use the HDR, the next steps would be Definition, Focus, brightness, etc.   In a program like Photoshop, you’d want to do multiple layers.  You would want to define these layers and then use them to create your image. There’s also the pre-brighten, pre-darken, etc. in the HDR Function– all things you’d want to do as a layer (or even as a ‘stack’, though doing as a layer is much better and faster, of course).

    The Sagelight model of these sub-functions is to perform the things you’d naturally reach for, but in the function itself.  For example, adding saturation, noise reduction (which I am about to replace with the NL Wavelet NR), and so-forth — all working as multiple layers.  In the case of the HDR, this is about 10 or so layers, all controllable.

    This adds an incredible amount of power to the function — and this is part of the UI consideration I am working with right now, and am looking to solve in just the right way.  I will get back to this in a couple paragraphs.

  2. Act as mini-editors on their own — to do the things you’d want to do in a program specifically designed for such a task, but within Sagelight.  This is why Sagelight is both non-destructive and necessarily destructive.  Sagelight’s model is a blend of Lightroom’s model (non-destructive, for the most part, but not 100%), and Photoshop’s Model (fairly and also necessarily destructive).

    Most people don’t realize that when you use a Lightroom Plugin, an .8BF plugin, or save your image and go out to another program (or plug-in), you’ve caused a ‘destructive’ sequence on your image — this is directly implied in the term ‘stack’; that is, each ‘stack’ or ‘stack layer’ is a destructive action performed on your image.

    Destructive Image Editing is good and necessary.

    Yes, I said it.  And I will be emphasizing this as I get the new UI out, as one of the main emphases of the new UI is to not only delineate better between when Sagelight is being non-destructive and when you’ve chosen to do something destructive, but to also promote (and, realistically, confront the idea that this is really happening in all major editors when you want to do more than just a few adjustments… we just don’t talk about it because, for some reason, it’s become a bad thing to say.  So the industry uses terms like ‘stack’ to avoid the whole idea, even though that’s exactly what’s happening, and for a good reason).

    Want real localized editing? Want to merge elements of the history buffer onto a new image? Want Bokeh, HDR, Surface Blur, etc? Want to do anything that doesn’t look the same as the image you did yesterday and the day before? Welcome to the wonderful world of safe, necessary, and high-quality destructive editing.

    Lightroom itself is titled “Adobe Photoshop Lightroom“, because it is meant to be a companion to Adobe Photoshop — it’s meant to work with the blending of destructive editing and non-destructive editing, both of which have their own, definite and powerful place in the image-editing process.  It was never meant to stand by itself one one global non-destructive operation.  You really can’t do advanced editing this way.

    Sagelight merges this concept by using non-destructive editing in all sub-programs/functions, but then providing “plug-in”-style editing within Sagelight for more power.

    This is why Lightroom doesn’t do things like Bokeh, HDR, etc. — and for the similar things it does do via plug-ins, you’ve created a ‘stack’, or to say it another way, a ‘destructive’ act on your image.  It leaves it to Photoshop and Plug-ins, which is just fine.

I Want it All – I wrote Sagelight as a Highly Advanced Editor to Provide Incredible Power.

I intend to keep it this way.  The reason why the Sagelight User-Interface can seem ‘busy’ sometimes is because it offers you power.  Those Windows and Controls that come up when you use the Light Blender – as well as the curves and Equalizer controls – have a very powerful effect on your image.

The Light Blender as an Example

Let’s look at that for just a second, with the Light Blender as an Example,

Ok, you press a Light Blender control, and another control window comes up where you can use some equalizers.  When you use the strength settings, these equalizers are set automatically.

Then you can change them.  Then you can move to a 7-band equalizer (from the 5).  This adds a tremendous amount of control.

But, if you really want the most out of it, you can bring up the curves window which gives you ultimate control of what is happening in the Light Blender. This practically gets you to the programmer level by being able set any curve you want, which can be very powerful (more of this will be apparent when I release some presets in the new UI).

Cleaning up the Light Blender

Sure, that can get a little confusing, and this is why the new UI is being created right now.

Part of the new UI is to clean all of this up a little bit, but not to lessen the power of the Light Blender.

Basically, you can go from Simple Controls->5 Band Equalizer->7-Band Equalizer->Curves Window

This is the Sagelight Model – to move from ease-of-use to more advanced complexity.

That’s a lot of power for the Light Blender, not to mention being able to select the lighting modes and so-forth.  Definitely all advanced functionality, but also very useful, especially if you understand things like ‘Soft Light’, ‘Hard Light’, and ‘Vivid Light’ in terms of their representative mathematical functionality.  But, you don’t have to to use the Light Blender.

The new UI will have this more organized and easier to use.  This isn’t exactly an easy thing to do, but also not impossible.

The Real Power of the HDR Function (as an Example of the Sagelight Model)

Here are just some of the controls in the HDR function, and what they do:

    • HDR Compression Strength.  This function can be used in a few ways, depending on the settings below it.  Basically, this uses the HDR function itself to ‘compress’ the dynamic range in your image. It can recover highlights, fill in very dark areas, as well as create definition in your image, not to mention more artistic and artificial HDR effects.  At small levels, this slider keeps the realism in your image while bringing out a natural HDR quality and definition in your image.
    • Exposure.  In some HDR modes, this is a very impressive slider.  When at a low value, it helps the HDR recover highlights.  At a higher value (with the HDR Compression Strength value fairly low, i.e. < 20), if can create a great ‘fill light’ effect with zero halos. 
    • Contrast Mode.  When checked, the HDR tends to balance the image more, keeping higher contrast.  When not checked, the HDR tends to keep the light steady, with less contrast, and more helpful to fill dark areas in the image.
    • Reduce NoiseThis will soon change to a slider and use the NL Wavelet method; this makes all the difference in the HDR image.
    • Pre-Brighten.  This is a very powerful slider, and is a good example of why so many controls appear in the HDR.  This is also a very specific slider, based on the Reinhardt Curve, which is meant to mimic the way the human eye sees light. You don’t even need the HDR Compression Value for this function.  It fills your image so the HDR can work better, but even without the HDR, it works very well in conjunction with the other tools.
    • Pre-Darken.  This is the same as Pre-Brighten, and has a similarly amazing effect on the highlights in your image.
    • Pre-Brighten Feather.  Here is a control that seems like it might not be so necessary.  But, it can make a big difference on the pre-brighten and pre-darken, especially if you use the HDR Compression Strength Slider or not.  With no feather, you are guaranteed no halos with the HDR result (for the most part).  With higher settings, the image looks clearer (more defined), but may have small halos in the image.  This is why the ‘Light’ Setting exists — to split the difference; when combined with the Focus slider, this can be good option to get what you want and to avoid halos.   Actually, you wouldn’t believe how much code and little switches exist in Sagelight just for the specific purpose of avoiding halos!
    • Low-Tone Contrast, Smart Contrast, Highlights. These are the same tools in the Quick Edit Mode, but very useful in the HDR — why not have them in the HDR so you can get an instant, auto-layered result?
    • Smart-Midtone Contrast.  This is another very powerful and useful tool.  Used with the Smart Contrast, this handles the midtones extremely well, and can add some great definition and contrast to your image without halos — this is the same contrast slider in the Smart Light, and is one of the most powerful features in Sagelight (in an overall sense)
    • Focus.  This performs a local contrast, and is very useful as a general tool, and more specifically for getting definition out of your image when using the HDR and pre-brighten/pre-darken controls.  This is another example of a control you would naturally want to use after the HDR function, and is, therefore, included as a layer in the overall HDR toolset.
    • Definition and Softness.  This adds definition to the image, but with more defined edges than the focus.  Interestingly, if you use it in the negative direction (softness), it can also be very useful with the HDR tool, providing a soft HDR look. 
    • Post Fill Shadows. This is basically the same tool as the pre-brighten slider, but is used after the HDR, Focus and Definition, and other tools, to provide a natural fill for the shadows — a common element when working with various photographs.
    • Post Saturation. This is another great example of providing tools and controls as layers in the program-within-program methodology of Sagelight.  Many tools in Sagelight have this Post Saturation tool.  This is because, and as with the HDR toolset, adding or removing color to an image after many operations is a tool used quite often and, therefore, also provided as a separate and automatic layer in the HDR toolset.
    • Color Recovery.  This is a good example of a tool that seems obscure, yet provides a very valuable function when it can be useful — and is also one of those advanced functions that you want if you’re at more of an expert level.
      Some tools, such as the Color Recovery, are only useful at times, but when they are useful, they do something very nice and sometimes important.
      This little slider turn out to be a major tool, and also shows a lot of the complexity going on behind the controls you use in the HDR and other functions.

      Each time you move a slider or flip a control on any layer in the HDR function, most layers are performed in RGB and LAB mode, and then put back together into the RGB output for each channel.  The default is LAB mode, but sometimes this loses color.  If the operations are performed in RGB mode, sometimes this leaves too much color.  So, basically, there is a choice — with some images — between too much color and too little color.  The Color Recovery slider starts mixing the RGB and LAB results, so you can recover some of the color lost in the LAB-mode calculations.
      Color loss in LAB mode mostly occurs when darker areas become lighter; and over-saturation occurs the other way in RGB mode.

      The Color Recovery slider is a good example of how Sagelight does these automatic layers and complex operations for you — the Color Recovery Slider is basically allowing you to do the function in LAB mode, RGB mode, or a mixture of both.

    • Equalization. This slider uses a Histogram Equalization calculation on the image.  This can sometimes provide great contrast to your image.  Even though its an advanced, more expert-level function, it is worth using — note that the Highlight Slider is duplicated next to the Equalization Slider.  This is because the Highlight Slider is something you tend to want to use in conjunction with the Equalization Slider, and I felt they were too far apart. 
    • Blend Curve.  Yet another major, very useful function!  The Blend Curve lets you blend the image you’re creating — with all of its layers and such — with the original image (i.e. the one before you entered the HDR function).  This blends the image on a light curve, either blending in dark areas or light areas with the current image.  This can be very helpful in isolating highlights or shadows, and can make a big difference in your image. 

      For example, if you want to just recover highlights, you can use the Blend Curve to focus on only the highlights — this allows you to use a higher strength in the HDR and other controls to get out more of what you want from the highlights without changing the shadows (or changing the shadows less).
      Conversely, if you want to fill in dark areas, you can use the HDR on a heavier setting to add definition without affecting the highlights (or affecting the highlights less).

    • Transparency. This slider allows you to merge the original image and the current HDR image by percentage.  The great thing about this slider is that if you use it in the negative direction, you can have more than a 100% transparency, which affectively amplifies the result, which can be a very good effect on some images.

And that’s not all of the tools in the HDR Panel function.  There’s also:

    •  the 2X Button
    •  Disable HDR Button
    • Focus Radius, Definition Radius
    • “Fill Low Shadows Only” checkbox on the Post-Fill Light Slider
    • Vibrant Colors Checkbox
    • Saturation as Vibrance Checkbox
    • Black and White Checkbox
    • HDR Preview Source Window (Entire Image or Preview)
    • “Base Img.” Checkbox (use Definition and Focus with the Base Image as a reference, which can be an interesting and useful effect)
    • Focus Slider (in the Advanced Mode — this is different than the other Focus Slider; I need to work on explaining what this does)
    • Blend Curve Feather Options (None, Light, Normal)
    • Equalizer Toner Weight (Shadows, Normal, Highlights), Reduce Halos Checkbox (for the Highlight Slider)
    • Edginess Slider
    • Edge Mode Checkbox
    • High-Res Checkbox
    • and, finally, the 20 Presets which are the basic presets used for the One-Shot HDR Controls.

All together, the above describes 38 different controls and 20 Presets in the HDR Panel alone, working in C*I*E LAB and RGB Mode, with 10 or so different automatic layers that you can control with various controls.

Another Case of Powerful a Toolset: Quick Edit Mode Live Fade Controls

Another example of a Sagelight toolset that is powerful but also needs to be managed well in the UI is the upcoming Fade Toolset in the Quick Edit Mode.  This is also another case of where Sagelight provides some very powerful image-editing options in a way where you would want to do this in a step-by-step manner in a program like Photoshop, but, instead, are able to do it with just a few controls in a real-time, non-destructive setting.

The Fade Controls also can represent the complexity of the Sagelight Engine.  If you’re familiar with the Photoshop Tool, “Fade… ” (i.e. Fade Last function), this is the same thing as the transparency tool in Sagelight’s Undo Brush — the exact same thing.

But, as Sagelight’s technology has grown, the usefulness of a simple ‘fade’ has grown, too!  Here are the different type of ‘Fade’ characteristics you will have in the Quick Edit Mode upon release of the new UI: 

  • Fade Current Image.  This ‘fades’ the image you’re creating in the Quick Edit Mode with the last ‘stack’ image (i.e. the current image without the Quick Edit settings).  A fade is simply another term for ‘transparency’; thus, a ‘fade’ of 50% would be an even mixture of the ‘current’ image and the image with the Quick Edit Settings.
  • Fade Original/History Image.  Fading with the original image is a very powerful tool.  I recommend this for a lot of operations — for example, if you use HDR, Soft Glow, etc., it can often be good to put a touch of the original image back. 
  • Select History Image.   You can also fade an image that is a snapshot or ‘stack’/history image.  You can make a number of changes and merge this easily with the selected image state, whether it’s the original or a selected history state or snapshot image.  This technique has proven to be a great  technique because some overall changes can be overwhelming, and mixing them with a previous state can help subdue the image and keep it more natural.
  • Blend Curve Fade.  You can also use a Blend Curve Fade, as described above in the HDR Panel description.  This allows you to easily isolate the highlights and/or shadows — this will work in real-time (as all of the Fade Controls do), so you can see the effect immediately without committing to your changes.   This is another good example of the power of the Sagelight Model
  • Blend Curve Feather.  As with the HDR controls, you can feather the Blend Curve with no Feather, a normal feather, or a light feather.  This can help keep halos away or to add definition.
  • Blend Curve Feather Fade. This is a great tool, as proven in the Light Blender (where it is known as the “Reduce/Soften Halos”).  This allows you to use a feather on the Blend Curve, but also reduce the halos by subduing the feather itself.    Trust me, it’s a nice tool.

The UI Design at Work — Wrangling and Systematizing Advanced Control Sets into an Easy-to-Use Format  (i.e., what I am working on right now).

As you can see, the HDR Panel is an absolute monster of a function! It’s truly a program within a program.  There is an amazing array of things you can do with this function by just using various controls together.  This is done on purpose to make Sagelight truly a professional-level editor (let’s also not forget about the heavy math engine using 32-bit floating-point per-channel, and lots of multi-processor SSE4 code).  I could write constant blog posts just on the HDR function, as well as the Bokeh, Light Blender, and numerous other Sagelight functions.

Though a smaller group of controls, the Fade Controls coming to the Quick Edit Mode are pretty hefty — and this is just one set of dozens of tools already in the Quick Edit Mode. 

The working being done right now is to provide these controls in an easier-to-use format.   For me, these tools are already accessible, but the entire idea behind Sagelight is to provide an easy-to-use interface that progressively gets more advanced. 

Advanced Functions Require Some Experience with Any Program (including Sagelight)

I don’t want to pretend (or lose track of the fact) that advanced controls do mean some experience with the program you’re using.  With Sagelight, I try to provide an interface where you can just flip a switch, and it if works, it works — then you can continue to use it, even if you don’t know exactly what it does. 

On the other hand, there are some controls where you are better off knowing what is going on, and this requires some experience. 

I want to make sure that it is understood that sometimes an interface needs to be complex to support complexity!  The idea here is not to make everything simple.  That just can’t be done.   The main idea is to make Sagelight work in graduated steps, so you can use these higher-level controls as you feel ready to use them, and they stay out of you’re way until then (or can be used in a way where you can just know to use them without necessarily knowing what they do). 

Mixing an easy-to-use interface that also moves into high-end, professional-level territory with tools that even Photoshop doesn’t provide (i.e. check out the Power Curves; they are much more powerful than Photoshop) is definitely a challenge, but also not impossible.

Conclusion

While there are clearly some needed additions to Sagelight, I’ve also realized that Sagelight has so many powerful functions, it’s time to make them even more useful and organized.

For most people, this will mean a whole new Sagelight as functions that were previously not used much suddenly become very useful.

I’m particularly excited about the overall Quick Edit Mode, as well as the HDR and Light Blender, as these are powerful functions that can be used for most pictures in some way or another.

My idea with Sagelight is to provide a lot of power and flexibility, so that you can explore your creativity and create great images.  I never liked the one-shot non-destructive model, where you end up making the same sort of creation from image to image (i.e. the ‘typical’ editor of today).

By mixing the best of non-destructive editing with safe, needed, and creative functions that act as Lightroom-style Plug-ins or Photoshop Functions (i.e. destructive functions), you get the best of both worlds.

Sagelight is realistically just one more version out from being right at my vision for it.  At the moment, it is very powerful and offers a lot of tools.  I am looking forward to even more.

Hopefully, I’ve described the Sagelight model well: to offer ease-of-use with a very high-quality, advanced function set, some of which aren’t even seen in Photoshop (i.e. Power Curves, full Bokeh Functionality, HDR controls, Retinex, Light Blender, etc.). 

Designed with an internal 32-bit-per-channel (being extended to 64-bit floating-point these days), the internal mathematical engine is fast and accurate.  I think I showed some examples somewhere where you can sharpen, sharpen more, and continue to sharpen with zero artifacts in the Bokeh, for example.

Right now, definitely explore Sagelight.  

It’s still cheap, and the new UI and all of the new toolsets comes with the current version (i.e. all purchased versions are still lifetime versions, while I get the true “release” version of Sagelight out there – it’s been a bit delayed while I’ve added powerful tools; this was always the plan: add powerful tools, then deal with the UI, because when it happens the other way around, the powerful tools never happen)